Overview
This project demonstrates how to send data from one board to another using a LoRa (Long Range) communication module. This project needs a transmitter and a receiver. The transmitter waits for user input from the serial monitor. Once input is received it transmits the string via LoRA to the receiver which prints it on its serial monitor.
Microcontroller
This project will show you how to connect the LoRa module to an ESP32, an ESP8266, and an Arduino Nano.
Components
Both the transmitter and the receiver will use the components listed below.
| Component | Purpose |
|---|---|
| RA02-SX1278 | This will be the LoRa module |
| SX1278 antenna | This will be the LoRa module antenna |
Circuit Diagrams
ESP32

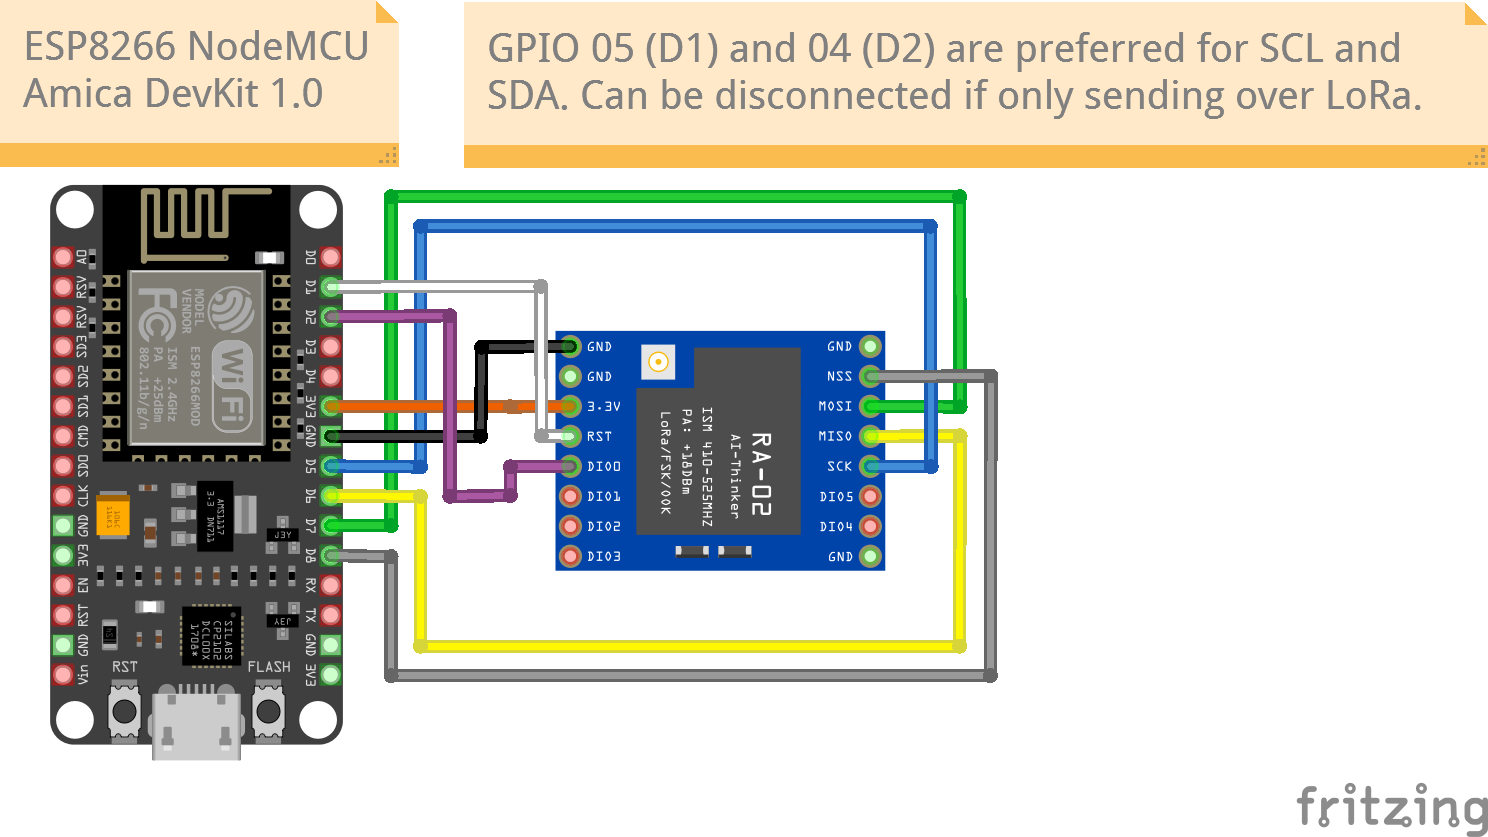
ESP8266
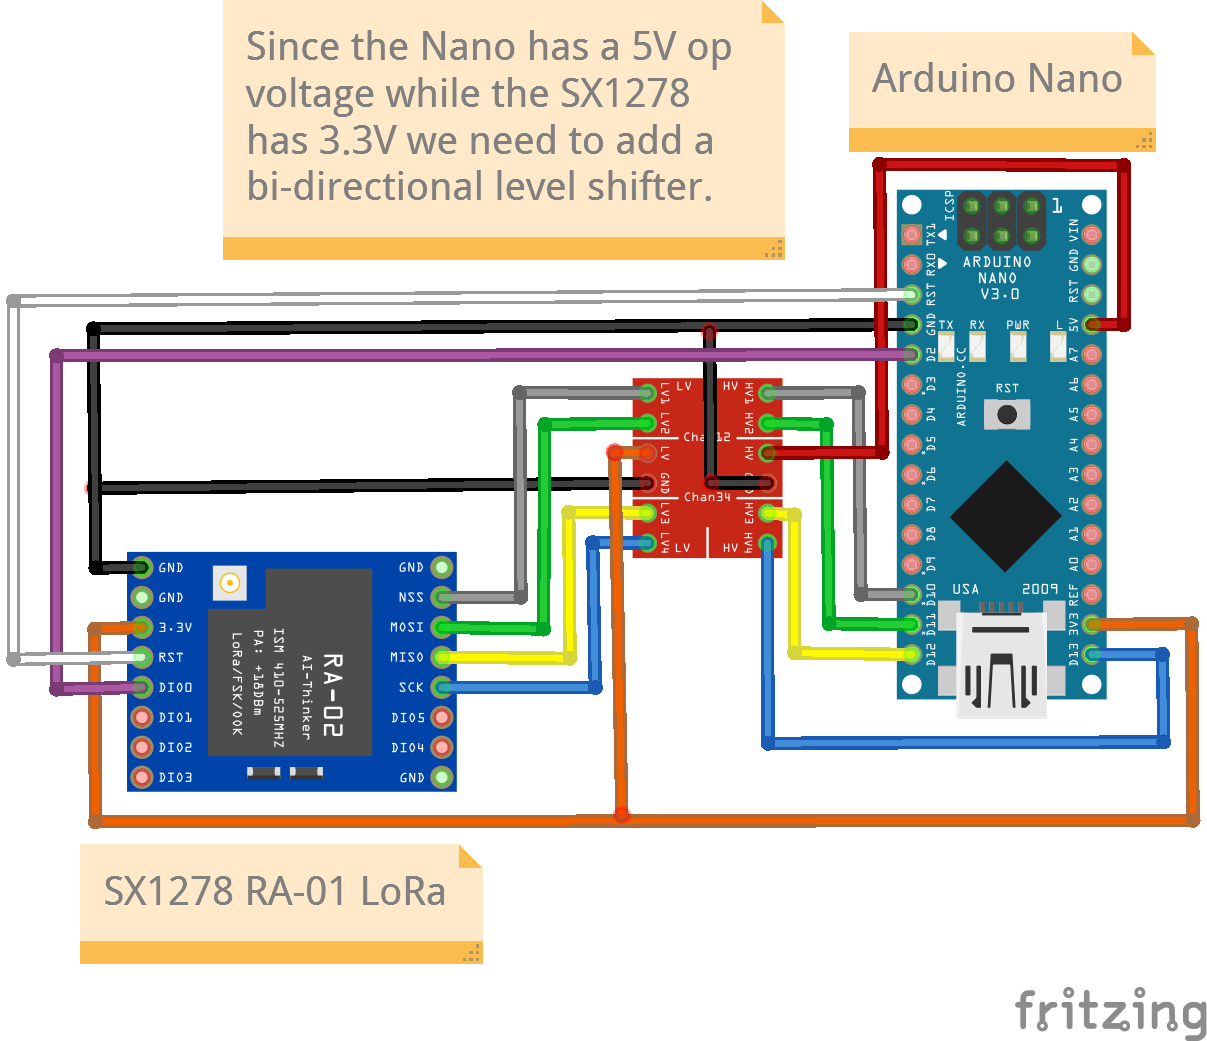
Arduino Nano
Since the Nano has a 5V operating (signal) voltage while the SX1278 has 3.3V we need to add a bi-directional level shifter. A direct connection without a level shifter may damage the SX1278 module.
Connections
Connect the antenna to the SX 1278 Module to improve the range and performance.
RA-02-SX1278 Module
Both the transmitter and the receiver will have the connections listed below. Please see the connections for the microcontroller you are using`.
| SX1278 RA-02 | ESP32 |
|---|---|
| 3.3V | 3.3V |
| GND | GND |
| COPI (MOSI) | D23 |
| CIPO (MISO) | D19 |
| SCK | D18 |
| NSS | D5 |
| RST | D25 |
| DIO0 | D26 (should be interrupt enabled) |
Since the Nano has a 5V operating (signal) voltage while the SX1278 has 3.3V we need to add a bi-directional level shifter. A direct connection without a level shifter may damage the SX1278 module.
| SX1278 RA-02 | Arduino Nano |
|---|---|
| 3.3V | 3.3V |
| GND | GND |
| COPI (MOSI) | D11 |
| CIPO (MISO) | D12 |
| SCK | D18 |
| NSS | D13 |
| RST | RST |
| DIO0 | D2 (should be interrupt enabled) |
The pins are required for I2C SCL and SDA as ESP8266 seems to have few usable pins. Since this board is only sending data and not receiving the RST and DIO0 can be disconnected.
| SX1278 RA-02 | ESP8266 |
|---|---|
| 3.3V | 3.3V |
| GND | GND |
| COPI (MOSI) | GPIO8 (SD1) or GPIO13 (D7) |
| CIPO (MISO) | GPIO7 (SD0) or GPIO12 (D6) |
| SCK | GPIO6 (SCLK) or GPIO14 (D5) |
| NSS | GPIO11 (CMD) or GPIO15 (D8) [Chip Select] |
| RST | GPIO5 (D1) [This is preferred for I2C SCL] |
| DIO0 | GPIO4 (D2) [This is preferred for I2C SDA] |
Code
Transmitter
/*
  Project: LoRa Communication
  Project Description:
  This project is to transfer data from one microcontroller (the transmitter) to another (the receiver),
  using LoRa communication using the SX1278 LoRa module. The communication is bi-directional.

  This is the code for the transmitter. The code for the receiver is in lora-receiver.ino

  Author: STEMVentor Educonsulting

  This code is copyrighted. Please do not reuse or share for any purpose other than for learning with subscribed STEMVentor programs.
  This code is for educational purposes only and is not for production use.
*/

// LIBRARIES
#include <SPI.h> // Library for LoRa communications
//https://github.com/sandeepmistry/arduino-LoRa
#include <LoRa.h> // Library for LoRa communications

// PIN DEFINITIONS
// Note that the GPIO numbers should be used in code not the numbers printed on the board.
// ESP32
/*
  SX1278      -> ESP32
  3.3V        -> 3.3V
  GND         -> GND
  COPI (MOSI) -> D23
  CIPO (MISO) -> D19
  SCK         -> D18
  NSS         -> D5
  RST         -> D25
  DIO0        -> D26 (should be interrupt enabled)
*/

// ESP8266 NodeMCU (LoLin V3)
// (will be different for Amica DoIT V2)
/*
  SX1278      -> NodeMCU
  3.3V        -> 3.3V
  GND         -> GND
  COPI (MOSI) -> GPIO8 (SD1) or GPIO13 (D7)
  CIPO (MISO) -> GPIO7 (SD0) or GPIO12 (D6)
  SCK         -> GPIO6 (SCLK) or GPIO14 (D5)
  NSS         -> GPIO11 (CMD) or GPIO15 (D8) [Chip Select]

  The RST and DIO0 connections below work ok.
  However, the pins are required for I2C SCL and SDA as ESP8266 seems to have few usable pins.
  Since this board is only sending data and not receiving the RST and DIO0 can be disconnected.
  RST         -> GPIO5 (D1) [This is preferred for I2C SCL]
  DIO0        -> GPIO4 (D2) [This is preferred for I2C SDA]
*/

// Nano
// Since the Nano has a 5V op voltage while the SX1278 has 3.3V we need to add a bi-directional level shifter.
/*
  SX1278      -> Nano
  3.3V        -> 3.3V
  GND         -> GND
  COPI (MOSI) -> D11
  CIPO (MISO) -> D12
  SCK         -> D18
  NSS         -> D13
  // If a software reset option is not required this need not be connected.
  // Or it can be connected to the hardware reset pin so the module will reset when the board is reset.
  RST         -> RST
  DIO0        -> D2 (should be interrupt enabled)
*/

// Need to define even if not connected.
#define NSS_PIN 15
#define RST_PIN 5
#define DIO0_PIN 4

// GLOBAL VARIABLES
int incomingByte = 0; // for incoming serial data
String incoming_string = ""; // for incoming serial data string
//  To store the message to be sent to the receiver over LoRa.
String outgoing_msg = "Default message";

// LOCAL FUNCTIONS

//Read an entire string and then transmit it via LoRa (this is a blocking function and waits until timeout).
void readString()
{
  Serial.println("Enter a data string to be transmitted via LoRa:");
  while (Serial.available() == 0) {} //wait for data available
  incoming_string = Serial.readString(); //read until timeout
  // incoming_string.trim(); // remove any \r \n whitespace at the end of the String
}

void sendSerialData(String outgoing) //sends the data as a string over LoRa
{
  Serial.println("Sending packet id " + outgoing.substring(0,1));
  LoRa.beginPacket();                   // start packet
  LoRa.print(outgoing);                 // add payload
  LoRa.endPacket();                     // finish packet and send it
  Serial.println("Sent packet id " + outgoing.substring(0,1));
}

// Read data from sensors and transmit to receiver over LoRa.
void sendTestData() {
  Serial.print("Sending packet: ");
  Serial.println(counter);

  // Test data
  // Send bursts of packets so that the microcontroller reads at least one. Is this required? It seems to receiving correctly if sent only once.
  // for(int j = 0 ; j < 50 ; j++){
    LoRa.beginPacket();
    LoRa.print("hello ");
    LoRa.println(counter);
    LoRa.endPacket();
    // delay(1000);
  // }
  counter++;
}

// Setup LoRa
void LoRaSetup() {
  Serial.begin(9600);
  // Wait until serial port is opened.
  while (!Serial);

  // Initialize LoRa
  // void setPins(int ss = LORA_DEFAULT_SS_PIN, int reset = LORA_DEFAULT_RESET_PIN, int dio0 = LORA_DEFAULT_DIO0_PIN);
  LoRa.setPins(NSS_PIN, RST_PIN, DIO0_PIN);

  //Select the frequency accordng to your location
  //433E6 for Asia
  //866E6 for Europe
  //915E6 for North America
  if (!LoRa.begin(433E6)) {
    Serial.println("LoRa initialization failed!");
    // Try repeatedly until initialization is successful.
    while(1);
    delay(1000);
  }

  // OR

  // while(!LoRa.begin(433E6)) {
  //   Serial.println("LoRa initialization failed!");
  //   delay(1000);
  // }

  Serial.println("LoRa receiver initialized!");

  // The transmitter microcontroller should have the same syncword in order to make this connection private and secure.
  LoRa.setSyncWord(0xA5);
}

// THE setup FUNCTION RUNS ONCE WHEN YOU PRESS RESET OR POWER THE BOARD.
void setup()
{
  // Start the serial communication with baud rate suitable for your components.
  Serial.begin(9600);
  LoRaSetup();
  Serial.println("LoRa module initialized!");
}

// THE loop FUNCTION RUNS OVER AND OVER AGAIN FOREVER UNTIL THE BOARD IS POWERED OFF.
void loop()
{
  // sendTestData();
  readString();
  sendSerialData(receivedString);
}
Receiver
/*
  Project: LoRa Communication
  Module: LoRa Receiver
  Description:
  This sketch is for the LoRa receiver microcontroller using the SX1278 LoRa module. This sketch has two options to receive data, one using a callback function (this needs the DIO0 pin to be connected to an interrupt pin on the board) and one in a loop (which does not need an interrupt pin).

  Author: STEMVentor Educonsulting

  This code is copyrighted. Please do not reuse or share for any purpose other than for learning with subscribed STEMVentor programs.
  This code is for educational purposes only and is not for production use.
*/

// LIBRARIES
#include <SPI.h> // Library for LoRa communications
//https://github.com/sandeepmistry/arduino-LoRa
#include <LoRa.h> // Library for LoRa communications

// PIN DEFINITIONS
// Note that the GPIO numbers should be used in code not the numbers printed on the board.
// ESP32
/*
  SX1278      -> ESP32
  3.3V        -> 3.3V
  GND         -> GND
  COPI (MOSI) -> D23
  CIPO (MISO) -> D19
  SCK         -> D18
  NSS         -> D5

  // If a software reset option is not required this need not be connected.
  // Or it can be connected to the hardware reset pin so the module will reset when the board is reset.
  RST         -> D25
  DIO0        -> D26 (should be interrupt enabled)
*/

// ESP8266 NodeMCU (LoLin V3)
// (will be different for Amica DoIT V2)
/*
  SX1278      -> NodeMCU
  3.3V        -> 3.3V
  GND         -> GND
  COPI (MOSI) -> GPIO8 (SD1) or GPIO13 (D7)
  CIPO (MISO) -> GPIO7 (SD0) or GPIO12 (D6)
  SCK         -> GPIO6 (SCLK) or GPIO14 (D5)
  NSS         -> GPIO11 (CMD) or GPIO15 (D8) [Chip Select]

  // The RST and DIO0 connections below work ok.
  // However, the pins are required for I2C SCL and SDA as ESP8266 seems to have few usable pins.
  // Since this board is only sending data and not receiving the RST and DIO0 can be disconnected.

  // If a software reset option is not required this need not be connected.
  // Or it can be connected to the hardware reset pin so the module will reset when the board is reset.

  RST         -> GPIO5 (D1) [This is preferred for I2C SCL]
  DIO0        -> GPIO4 (D2) [This is preferred for I2C SDA]
*/

// Nano
// Since the Nano has a 5V op voltage while the SX1278 has 3.3V we need to add a bi-directional level shifter.
/*
  SX1278      -> Nano
  3.3V        -> 3.3V
  GND         -> GND
  COPI (MOSI) -> D11
  CIPO (MISO) -> D12
  SCK         -> D18
  NSS         -> D13
  // If a software reset option is not required this need not be connected.
  // Or it can be connected to the hardware reset pin so the module will reset when the board is reset.
  RST         -> RST
  DIO0        -> D2 (should be interrupt enabled)
*/

// ESP32
#define NSS_PIN 5
#define RST_PIN 25
#define DIO0_PIN 26

// GLOBAL VARIABLES
// To store the message sent by the transmitter over LoRa.
String incoming_msg = "";

// LOCAL FUNCTIONS

/* When a packet is received over LoRa it triggers an interrupt on the DIO0 pin (which should be interrupt enabled). This is the callback function that is called on the interrupt. Keep it small, doing too much in an interrupt function causes the board to "panic" and hang. Simply return the received value in a global variable and take up processing elsewhere.
*/
void onReceive(int packetSize) {
  // Serial.println(packetSize);
  // If there is no packet, return without any further processing.
  if (packetSize == 0) return;

  // Any of the Serial APIs/Functions can be used to read the LoRa data

  // while (LoRa.available()) {
  //   incoming_msg += (char)LoRa.read();
  // }
  // Serial.println("Message: " + incoming_msg);

  // OR

  // for (int i = 0; i < packetSize; i++) {
  //   Serial.print((char)LoRa.read());
  // }

  // OR

  Serial.print(LoRa.readString());

  // print RSSI of packet
  // Serial.print("' with RSSI ");
  // Serial.println(LoRa.packetRssi());
}

// This is the alternative approach where you keep listening in a loop and act on the data if a packet is received.
// With this you can do a lot in the function itself but it is not the most efficient approach in general.
void LoRaListenInLoop(){
  // try to parse packet
  int packetSize = LoRa.parsePacket();
  if (packetSize) {
    // received a packet
    Serial.print("Received packet '");

    // read packet
    while (LoRa.available()) {
      // Serial.print((char)LoRa.read());
      String lora_data = LoRa.readString();
      Serial.print(lora_data);
      displayOnOLEDByRow(1, "LoRa Data", 2, true);
      displayOnOLEDByRow(2, lora_data, 2, false);
    }

    // print RSSI of packet
    Serial.print("' with RSSI ");
    Serial.println(LoRa.packetRssi());
  }
}

// Setup
void setup() {
  Serial.begin(9600);

  // Wait until serial port is opened.
  while (!Serial);

  // Serial.println("LoRa Receiver with Callback.");
  // OR
  Serial.println("LoRa Receiver in a Loop.");

  // Initialize LoRa
  // void setPins(int ss = LORA_DEFAULT_SS_PIN, int reset = LORA_DEFAULT_RESET_PIN, int dio0 = LORA_DEFAULT_DIO0_PIN);
  LoRa.setPins(NSS_PIN, RST_PIN, DIO0_PIN);

  //Select the frequency accordng to your location
  //433E6 for Asia
  //866E6 for Europe
  //915E6 for North America
  if (!LoRa.begin(433E6)) {
    Serial.println("LoRa initialization failed!");
    // Try repeatedly until initialization is successful.
    while(1);
    delay(1000);
  }

  // OR

  // while(!LoRa.begin(433E6)) {
  //   Serial.println("LoRa initialization failed!");
  //   delay(1000);
  // }

  Serial.println("LoRa receiver initialized!");

  // The transmitter microcontroller should have the same syncword in order to make this connection private and secure.
  LoRa.setSyncWord(0xA5);

  // IF USING A CALLBACK
  // Register the receive callback
  // LoRa.onReceive(onReceive);
  // put the radio into receive mode
  // LoRa.receive();
}

// Loop
// void loop() {
//   // Do nothing if using callback
//   // OR
//   // Call the function to listen in a loop

//   LoRaListenInLoop();
// }