Overview
In this project we will learn to use Bluetooth Low Energy (BLE). We will use one of several open source apps on andriod and ios are available to communicate via BLE.
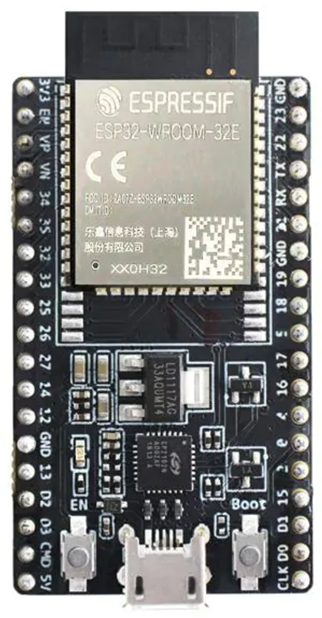
While there is a BLE module that connects to an Arduino board (the HM-10) it is not very easy to configure. Therefore, for BLE we will use the ESP32 which has built-in support for BLE.
Components
| Component | Purpose |
|---|---|
| ESP32 | The microcontroller. |
Circuit Diagram

Connections
No assembly required. Simply connect the ESP32 to your computer running the Arduino IDE.
Code
/*
  This is a combination of the example code for Notify and Write.
  Notify is to send data from the BLE board (this code) to the app.
  Write is to receive data from the app to the BLE board (this code).

  Video: https://www.youtube.com/watch?v=oCMOYS71NIU
  Based on Neil Kolban example for IDF: https://github.com/nkolban/esp32-snippets/blob/master/cpp_utils/tests/BLE%20Tests/SampleNotify.cpp
  Ported to Arduino ESP32 by Evandro Copercini
  updated by chegewara

  Based on Neil Kolban example for IDF: https://github.com/nkolban/esp32-snippets/blob/master/cpp_utils/tests/BLE%20Tests/SampleWrite.cpp
  Ported to Arduino ESP32 by Evandro Copercini

  Create a BLE server that, once we receive a connection, will send periodic notifications.
  The service advertises itself as: 4fafc201-1fb5-459e-8fcc-c5c9c331914b
  And has a characteristic of: beb5483e-36e1-4688-b7f5-ea07361b26a8

  The design of creating the BLE server is:
  1. Create a BLE Server
  2. Create a BLE Service
  3. Create a BLE Characteristic on the Service
  4. Create a BLE Descriptor on the characteristic
  5. Start the service.
  6. Start advertising.

  A connect handler associated with the server starts a background task that performs notification
  every couple of seconds.

  // See the following for generating UUIDs:
  // https://www.uuidgenerator.net/

  The UUIDs will be generated on the app for each BLE board
  (service and characteristics). Use the same UUIDs here.

  There will be a SENSOR_DATA service which will send sensor data to the app.
  and a CONTROL_SIGNAL service which will receive data from the app.

  Each sensor and controlled device will be a characteristic.
*/

// BLE Library is installed when the ESP32 board is added to the IDE
#include <BLEDevice.h>
#include <BLEServer.h>
#include <BLEUtils.h>
#include <BLE2902.h>
#include <BLE2901.h>

BLEServer *pServer = NULL;
BLECharacteristic *sensor1_characteristic = NULL;
BLE2901 *descriptor_2901 = NULL;

bool deviceConnected = false;
bool oldDeviceConnected = false;
uint32_t value = 0;
uint32_t rand_value = 0;

// See the following for generating UUIDs:
// https://www.uuidgenerator.net/

#define PERIPHERAL_NAME "SmartHome Comm"

// Number of services and characteristics per service are both limited to 7

// To be updated with the app generated UUIDs
#define SENSOR_DATA_SERVICE "49b8a4c2-35db-46a5-804e-e24aa49f38d9"
#define SENSOR_1_CHARACTERISTIC "7eaab413-63e5-47b9-a37c-315b382ab396"
#define CONTROL_SIGNAL_SERVICE "d7b470a7-a590-44e8-8c5e-6045fff9d345"
#define DEVICE_1_CHARACTERISTIC "ebf06ac0-9674-479b-ac3b-f05c9b32670a"

class MyServerCallbacks : public BLEServerCallbacks {
  void onConnect(BLEServer *pServer) {
    deviceConnected = true;
  };

  void onDisconnect(BLEServer *pServer) {
    deviceConnected = false;
  }
};

class ControlSignalCallbacks : public BLECharacteristicCallbacks {
  void onWrite(BLECharacteristic *pCharacteristic) {

    Serial.println("*** Value received ***");

    String value = pCharacteristic->getValue();
    Serial.print(value.toInt());

    if (value.length() > 0) {
      Serial.println("*********");
      Serial.print("New value: ");
      for (int i = 0; i < value.length(); i++) {
        Serial.print(value[i], DEC);
      }

      Serial.println();
      Serial.println("*********");
    }
  }
};

void setup() {
  Serial.begin(115200);

  // Create the BLE Device with the name that will be broadcast.
  BLEDevice::init(PERIPHERAL_NAME);

  // Create the BLE Server
  pServer = BLEDevice::createServer();
  pServer->setCallbacks(new MyServerCallbacks());

  // Create the SENSOR_DATA BLE Service which will send data to the app using the notify function, called when sensor data is recieved.
  BLEService *sensor_data_service = pServer->createService(SENSOR_DATA_SERVICE);

  // Create a BLE Characteristic
  sensor1_characteristic = sensor_data_service->createCharacteristic(
    SENSOR_1_CHARACTERISTIC,
    BLECharacteristic::PROPERTY_READ | BLECharacteristic::PROPERTY_WRITE | BLECharacteristic::PROPERTY_NOTIFY | BLECharacteristic::PROPERTY_INDICATE
  );

  // Creates BLE Descriptor 0x2902: Client Characteristic Configuration Descriptor (CCCD)
  sensor1_characteristic->addDescriptor(new BLE2902());
  // Adds also the Characteristic User Description - 0x2901 descriptor
  descriptor_2901 = new BLE2901();
  descriptor_2901->setDescription("Temperature Sensor Data.");
  descriptor_2901->setAccessPermissions(ESP_GATT_PERM_READ);  // enforce read only - default is Read|Write
  sensor1_characteristic->addDescriptor(descriptor_2901);

  // A value set using setValue is read by the app using BleClient.read(...)
  // But a more practical approach is to use notifications in a loop.
  sensor1_characteristic->setValue("Ready to start sending data...");

  // Start the service
  sensor_data_service->start();

  // Start advertising
  BLEAdvertising *pAdvertising = BLEDevice::getAdvertising();
  pAdvertising->addServiceUUID(SENSOR_DATA_SERVICE);
  pAdvertising->setScanResponse(true);
  pAdvertising->setMinPreferred(0x0);  // set value to 0x00 to not advertise this parameter
  BLEDevice::startAdvertising();
  Serial.println("Waiting a client connection to notify...");

  // Create the CONTROL_SIGNAL BLE service.
  BLEService *control_signal_service = pServer->createService(CONTROL_SIGNAL_SERVICE);

  BLECharacteristic *pCharacteristic =
    control_signal_service->createCharacteristic(DEVICE_1_CHARACTERISTIC, BLECharacteristic::PROPERTY_READ | BLECharacteristic::PROPERTY_WRITE);

  pCharacteristic->setCallbacks(new ControlSignalCallbacks());

  pCharacteristic->setValue("Listening for control signals...");
  control_signal_service->start();

  // BLEAdvertising *pAdvertising = pServer->getAdvertising();
  // pAdvertising->start();
}

void loop() {
  // notify changed value
  if (deviceConnected) {
    // print a random number from 10 to 19
    rand_value = random(0, 120);
    Serial.println(rand_value);

    // sensor1_characteristic->setValue((uint8_t *)&value, 4); // Unsigned 8-bit integer, 4-byte buffer
    // sensor1_characteristic->notify();

    // Simply sending the value without any casting and size parameter works.
    // Will allow 32 bit unsigned integers since value has been declared of type uint32_t
    // uint16_t should also be enough, uint8_t will only allow 256 values.
    sensor1_characteristic->setValue(rand_value);
    sensor1_characteristic->notify();

    // value=value+100;

    delay(10000);
  }
  // disconnecting
  if (!deviceConnected && oldDeviceConnected) {
    delay(500);                   // give the bluetooth stack the chance to get things ready
    pServer->startAdvertising();  // restart advertising
    Serial.println("start advertising");
    oldDeviceConnected = deviceConnected;
  }
  // connecting
  if (deviceConnected && !oldDeviceConnected) {
    // do stuff here on connecting
    oldDeviceConnected = deviceConnected;
  }
  delay(10000);
}
Test with an app
You can use one of several BLE Test Apps for Android and iOS to test your code.
⚠️
We do not recommend any specific app, rather we leave it to you to do your research and find a reliable and safe app.