Overview
A Radio-Frequency identification (RFID) system comprises two main components:
- A Tag, which is a transponder device with a microchip that stores data. A transponder (a combination of transmitter and responder) sends radio signals in response to signals received.
- A Reader which has a radio frequency module and an antenna that generates a high frequency electromagnetic field.
When triggered by an electromagnetic interrogation pulse from a nearby RFID reader, the tag transmits digital data back to the reader. The data in the tag may be pre-programmed or can be written over as required.
Passive tags are powered by energy from the RFID reader's interrogating radio waves. Active tags are powered by a battery and thus can be read at a greater range from the RFID reader, up to hundreds of meters.
Unlike a barcode, the tag does not need to be within the line of sight of the reader, so it may be embedded in the tracked object.
RFID tags are used in many industries. For example, an RFID tag attached to an automobile during production can be used to track its progress through the assembly line, RFID-tagged pharmaceuticals can be tracked through warehouses, and implanting RFID microchips in livestock and pets enables positive identification of animals. Tags can also be used in shops to expedite checkout, and to prevent theft.
In this project we are using RC522 RFID sensor module along to detect an RFID tag. The tag number read will be displayed on a 20X4 LCD with an I2C backpack.
The RC522 RFID module can be programmed to generate an interrupt, allowing the module to run a callback function to when a tag is detected, so you don't have to check for a tag continuously.
Components
| Component | Purpose |
|---|---|
| Arduino Nano | This will be the microcontroller |
| RC522 reader | This will be the RFID sensor |
| I2C LCD 20X4 | This will be the LCD display |
Circuit Diagram
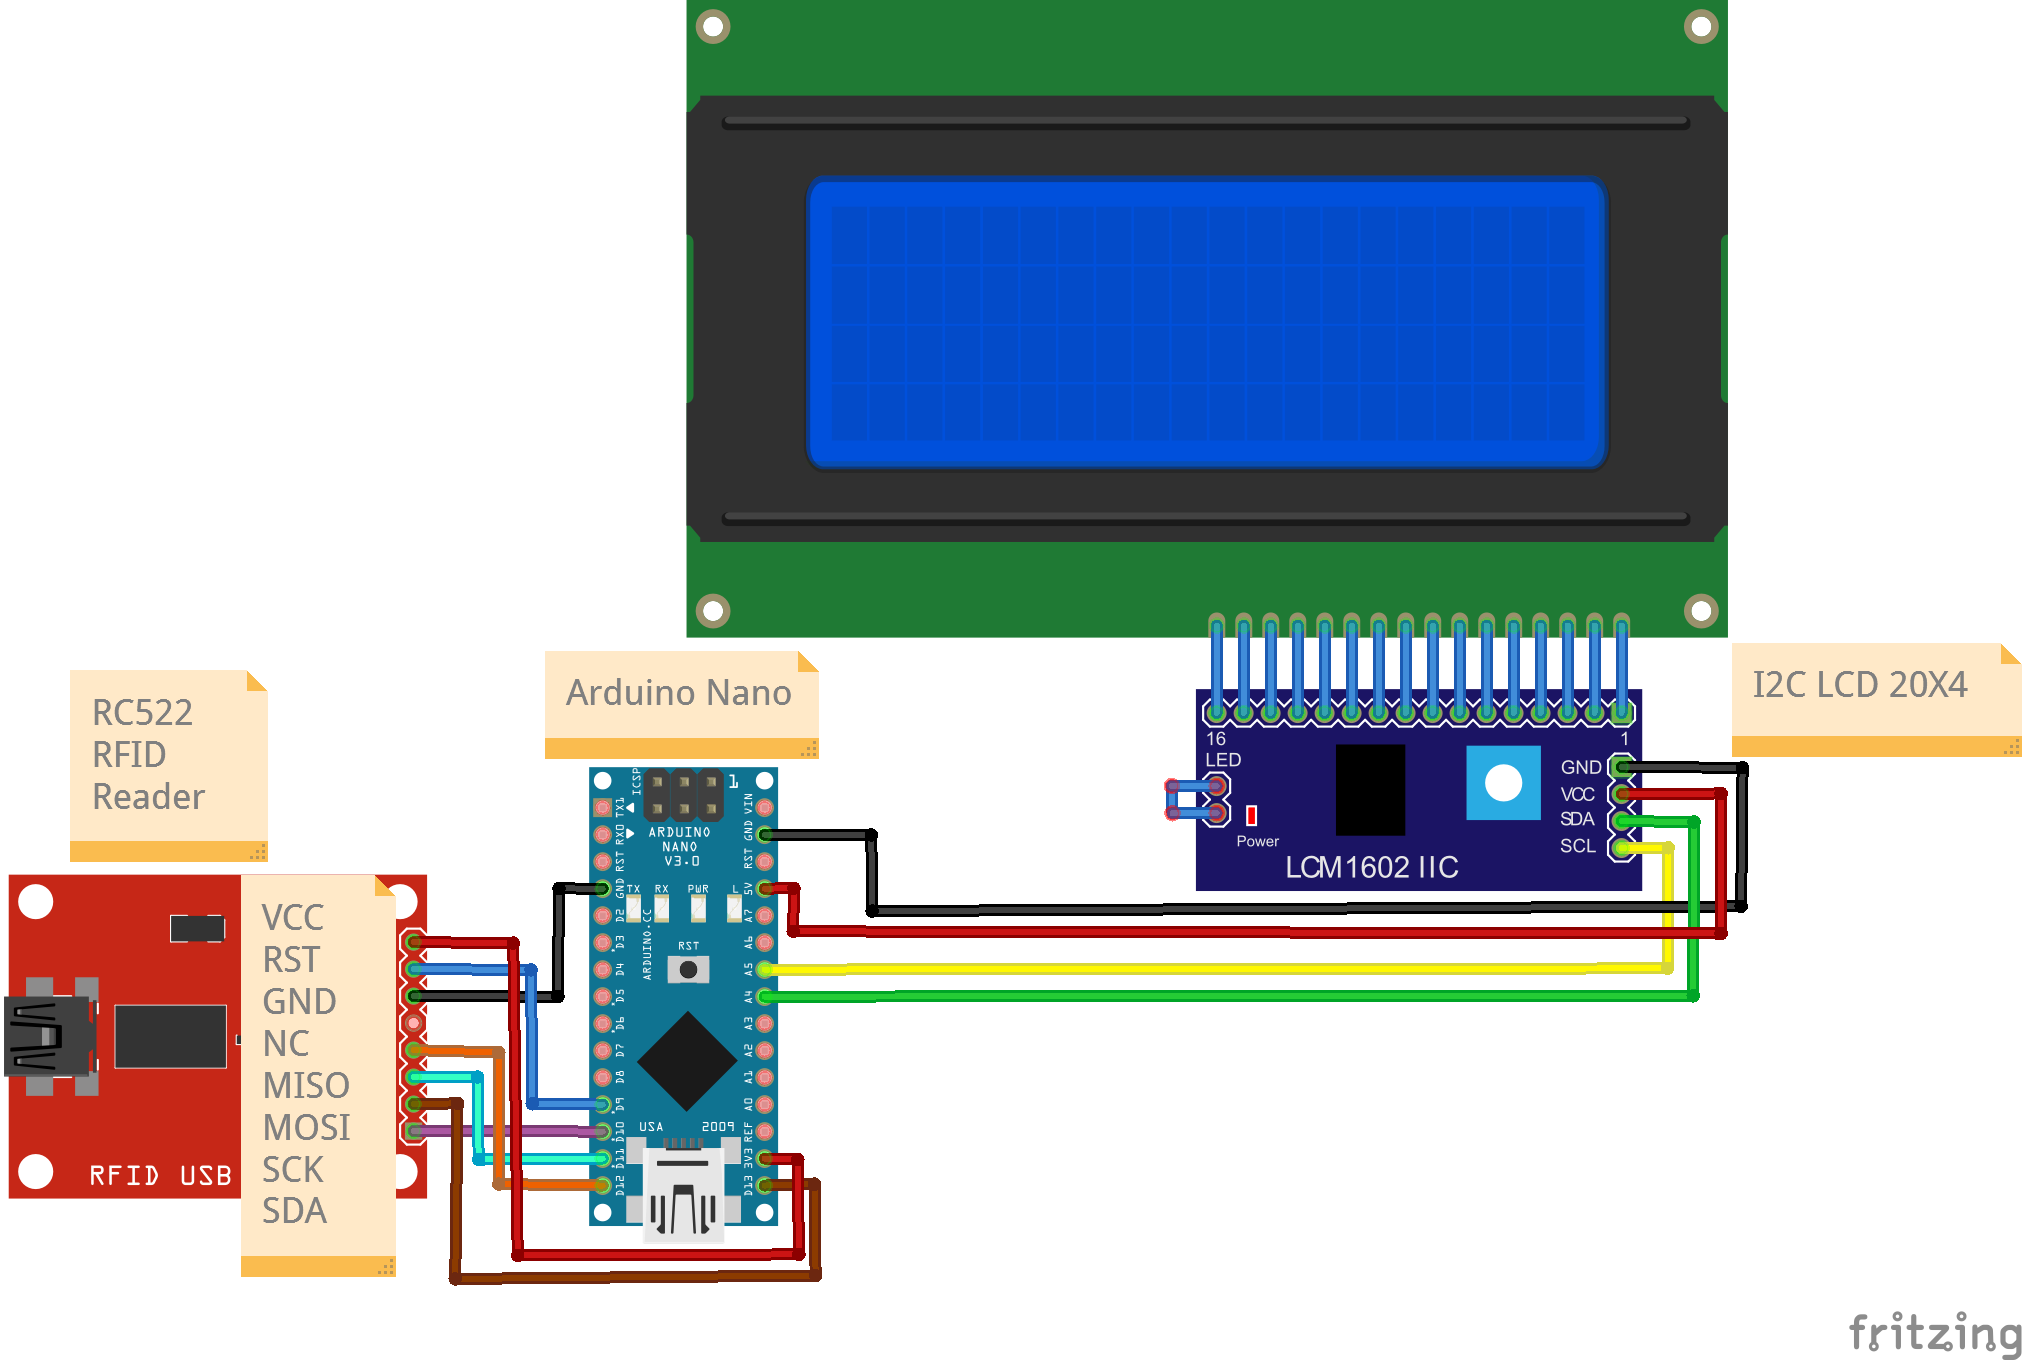
Connections
RC522 RFID Pin
| Nano Pin | RFID Pin |
|---|---|
| D9 | RST |
| D10 | SDA |
| D11 | Mosi |
| D12 | Miso |
| D13 | SCK |
| 3.3V | VCC |
| GND | GND |
I2C LCD Pin
| Nano Pin | I2C LCD Pin |
|---|---|
| A4 | SDA |
| A5 | SCL |
| 5V | VCC |
| GND | GND |
Code
/*
  Project: RFID Sensor value reading with output on LCD with I2C Backpack
  Project Description:
  This sketch writes readings read from a RFID sensor to an LCD display module.
  This sketch is for a 16x4 screen.

  Author: STEMVentor Educonsulting

  This code is copyrighted. Please do not reuse or share for any purpose other than for learning with subscribed STEMVentor programs.
  This code is for educational purposes only and is not for production use.
*/

// LIBRARIES

//used for communicating with I2C devices
#include <Wire.h>

//https://www.arduino.cc/reference/en/libraries/liquidcrystal-i2c/
// Install the LiquidCrystal I2C by Frank de Brabander from the IDE library manager.
#include <LiquidCrystal_I2C.h>

//for RFID CARD READER
#include <SPI.h>
#include <MFRC522.h>

// PIN DEFINITIONS
// define the pin to which the RFID sensor is connected
// Arduino Nano
#define RST_PIN 9
#define SS_PIN 10

// for ESP32
// #define SS_PIN 21
// #define RST_PIN 22
// GLOBAL VARIABLES
// Define the display size
const byte rows = 4;
const byte cols = 20;

// Used for reading a string.
String hex_value;
String dec_value;

/* INITIALIZE OBJECTS
 * Libraries usually follow an object-oriented approach that requires
 * an instance of the class to call its methods.
 */
/*
 * All I2C components have an address, the default is usually 0x27
 * If that doesn't work, see this:https://playground.arduino.cc/Main/I2cScanner/
 * The init statement accepts the address and the number of columns and rows.
 */
LiquidCrystal_I2C lcd(0x27, cols, rows);

MFRC522 rfid(SS_PIN, RST_PIN); // Instance of the class

MFRC522::MIFARE_Key key;

/* LOCAL FUNCTIONS */


/*
  Function to print to LCD on a single row.
  Takes the row number and the text to display on that row (max 20 chars, rest will be truncated).
  The entire display is cleared if the clear_all flag is true, else only the row is cleared (the default).
 */
void printToLCDByRow(int row, String text, bool clear_all = false){
  const char* twenty_spaces = "                    ";

  if(clear_all){
    lcd.clear(); //clears the entire display
  }

  lcd.setCursor(0, row-1);
  lcd.print(twenty_spaces); //clears the row
  lcd.setCursor(0, row-1); //cursor has to be set again after printing spaces
  lcd.print(text);
}

/*
 Function to print to LCD across rows with each row having 20 chars.
 Messages can be a maximum of 20x4 chars, rest will betruncated.
 The entire display is cleared before printing the text.
 Test string of 20 char:
 12345678901234567890
 Test strings of 80 chars:
 12345678901234567890123456789012345678901234567890123456789012345678901234567890
 Lorem ipsum dolor sit amet, consectetur adipiscing elit. Donec varius est donec.

 */
void printToLCD(String text){
  lcd.clear(); //clears the entire display

  byte chars_remaining = text.length();
  byte char_from = 0;
  byte char_to = chars_remaining < cols ? text.length() : char_from + cols;
  byte row = 1;

  while(chars_remaining > 0){
    String line = text.substring(char_from, char_to);
    printToLCDByRow(row, line);

    chars_remaining = text.length() - char_to;
    char_from = char_to;
    char_to = chars_remaining < cols ? text.length() : char_from + cols;
    row++;
  }

  Serial.println("Data string has been displayed on LCD");
}
void LCD_setup() // function to LCD setup
{
  // Initializing wire
  Wire.begin();
  // Initialize the LCD.
  lcd.init();
  // Turn on the blacklight and print a message.
  lcd.backlight();
  // Use the function to display text on each line indiviudally.
  printToLCDByRow(1, "I2C LCD Ready!", true);
  printToLCDByRow(2, "Enter some text.", false);
  printToLCDByRow(3, "Max 80 characters.", false);
  printToLCDByRow(4, "For a 20x4 LCD.", false);
}

void RC522_setup() //setup the RFID reader
{
  // Init SPI bus
  SPI.begin();
  // Init MFRC522
  rfid.PCD_Init();
}
void readRC522() //read function RFID sensor
{
  if(  rfid.PICC_IsNewCardPresent())
  {
    if ( rfid.PICC_ReadCardSerial())
    {
        dec_value = "";
        hex_value = "";
        for (byte i = 0; i < rfid.uid.size; i++) {
          Serial.print(rfid.uid.uidByte[i] < 0x10 ? " 0" : " ");
          Serial.print(rfid.uid.uidByte[i], HEX);
          hex_value.concat(String(rfid.uid.uidByte[i] < 0x10 ? " 0" : " "));
          hex_value.concat(String(rfid.uid.uidByte[i], HEX));
          dec_value.concat(String(rfid.uid.uidByte[i] < 0x10 ? " 0" : " "));
          dec_value.concat(String(rfid.uid.uidByte[i], HEX));
          delay(300);
        }
        Serial.println();
        hex_value.toUpperCase();
        dec_value.toUpperCase();
        printToLCDByRow(2, "card detected!", true);
        printToLCDByRow(3, hex_value, false);
        printToLCDByRow(4, dec_value, false);
    }
  }
  printToLCDByRow(1, "Put tag near reader", true);
  printToLCDByRow(2, "No card detected", true);
  delay(300);
}
/* SETUP CODE: runs once when the board starts up or resets */
void setup()
{
  // Start the serial communication with baud rate suitable for your components.
  Serial.begin(9600);
  LCD_setup();
  RC522_setup();
  Serial.println("The board is ready!");
  printToLCDByRow(1, "Put tag near reader", true);
}

/* MAIN LOOP: runs repeatedly at a very high frequency (1000s of times a second) */
void loop()
{
  readRC522();
}