Overview
This project demonstrates how to read an analog input from a Potentiometer and use it to control the brightness of an external LED using a microcontroller .The potentiometer value is read and mapped to a suitable range for PWM control, allowing the LED brightness to be adjusted based on the potentiometer's position.
Components
| Component | Purpose |
|---|---|
| Arduino Nano | The microcontroller |
| 3 pin potentiomter | The potentiometer |
| 2 pin LED | The LED |
Circuit Diagram
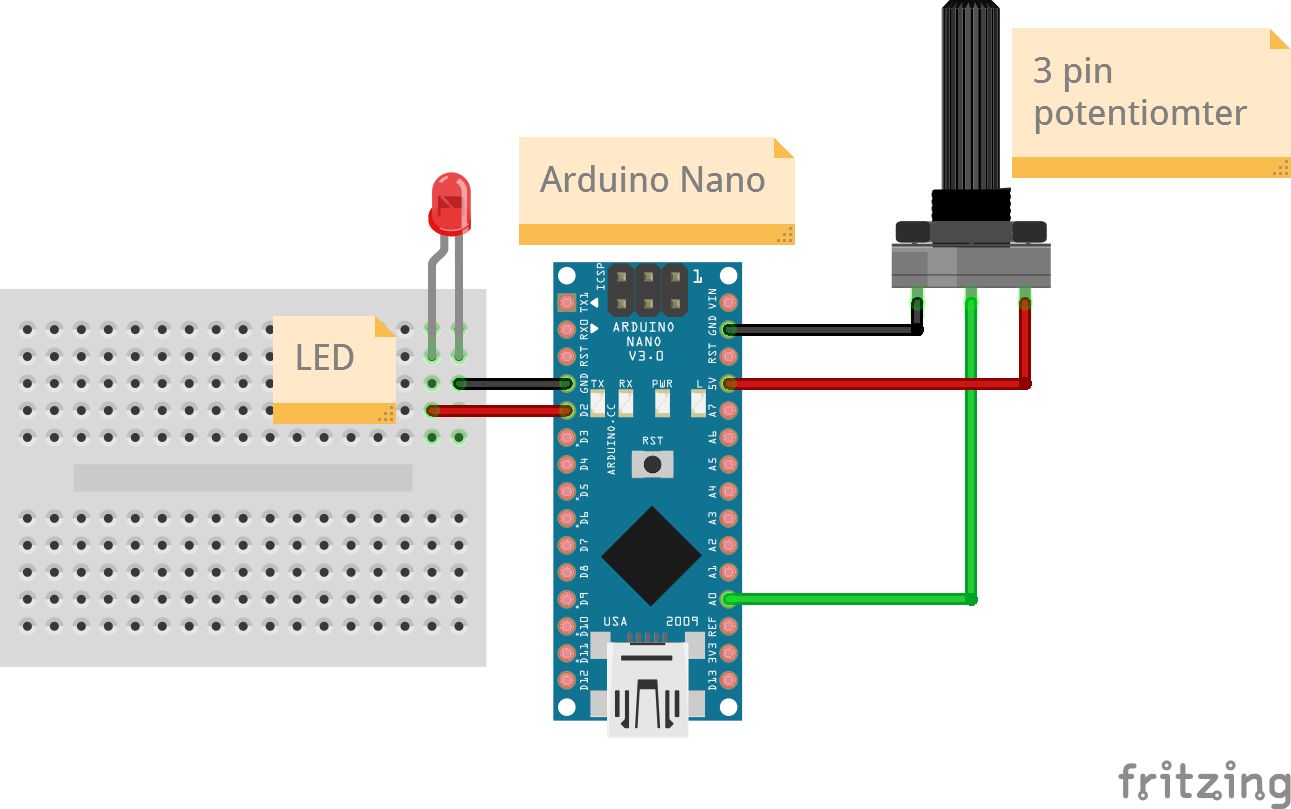
Connections
3 Pin potentiometer
| Arduino Nano Pin | Potentiometer Pin |
|---|---|
| A0 | Out/Sig |
| 5v | 3v3 |
| GND | GND |
2 pin LED
| Arduino Nano Pin | LED Pin |
|---|---|
| D2 | Anode (longer leg) |
| GND | Cathode (shorter leg) |
Code
/*
  Project: Potentiometer controlling an external LED.
  Project Description:
  This project will show you how to read a digital input from a Potentiometer and send a digital signal to a pin to turn an external LED on or off.

  Author: STEMVentor Educonsulting

  This code is copyrighted. Please do not reuse or share for any purpose other than for learning with subscribed STEMVentor programs.
  This code is for educational purposes only and is not for production use.
*/

// LIBRARIES

// PIN DEFINITIONS
// #define potentiometerPin A0 // The Potentiometer pin for Arduino Nano is A0 , un-comment if using Arduino Nano
// #define potentiometerPin 13 // The potentiometer for ESP32 is D13 , un-comment if using ESP32
// In an LED the longer pin is the anode (+ve) and is connected to the signal pin.
// The shorter pin is the cathode (-ve) and is connected to ground.
#define ledPin 2   // The LED pin for Arduino Nano and ESP32.

// CONSTANT DEFINITIONS

// GLOBAL VARIABLES
int potentiometerValue;
int brightness;

// THE setup FUNCTION RUNS ONCE WHEN YOU PRESS RESET OR POWER THE BOARD.
void ledSetup()
{
  // Initialize the LED pin as an output.
  pinMode(ledPin, OUTPUT);
  digitalWrite(ledPin, LOW);
}

void potentiometerSetup()
{
  // initialize the Potentiometer pin as an input.
  pinMode(potentiometerPin, INPUT);
}

void readPotentiometer()
{
  // Read the value of the Potentiometer state.
  potentiometerValue = analogRead(potentiometerPin);
  Serial.print("Potentiometer value: ");
  Serial.println(potentiometerValue);

  // For ESP32
  // brightness = map(potentiometerValue, 0, 4098, 0, 255); // analogWrite takes a number between 0-255 but the analogRead can return a number from 0-4098, hence using map function to reduce it below 255 proportionally

  // For Arduino Nano
  brightness = map(potentiometerValue, 0, 1024, 0, 255); // analogWrite takes a number between 0-255 but the analogRead can return a number from 0-1024, hence using map function to reduce it below 255 proportionally

  Serial.print("Brightness value: ");
  Serial.println(brightness);
}

void analogWriteLed(int value)
{
  analogWrite(ledPin, value);
}

void setup()
{
  // Start the serial communication with baud rate suitable for your components.
  Serial.begin(9600);
  ledSetup();
  potentiometerSetup();
  Serial.println("The board is ready!");
}

// THE loop FUNCTION RUNS OVER AND OVER AGAIN FOREVER UNTIL THE BOARD IS POWERED OFF.
void loop()
{
  delay(500);
  readPotentiometer();
  analogWriteLed(brightness);
}