Install Software
This is section will show you how to install the software required to deploy the nodes for your Devnet.
STEMVentor does not guarantee or vouch for any of the softwares listed below. It is your sole responsibility to verify all sources and to ensure your system has the required antivirus and anti-malware protection. Links to external websites are provided as a reference. Again, it is your responsibility to ensure the validity of any link before you click on it.
Hardware Requirements
In the simplest approach you will run all four nodes on the same machine. Given that nodes require signifcant computing power to run, your computer should have at least 16GB RAM and 30GB disk space (preferably an SSD). If you are planning to run one node per computer, 8GB RAM should be sufficient.
If all computers are on the same network, there should be no changes required. However, if computers are on different networks there would be changes required to ports and firewall access, which we will not be covering here.
These instructions are for UNIX (Ubuntu 22.x to be specific) using the command line interface. Although you can copy and run the commands as listed below it will help to be reasonably familiar with the command line interface. The commands should run on Windows as well but may need some operating system specific changes.
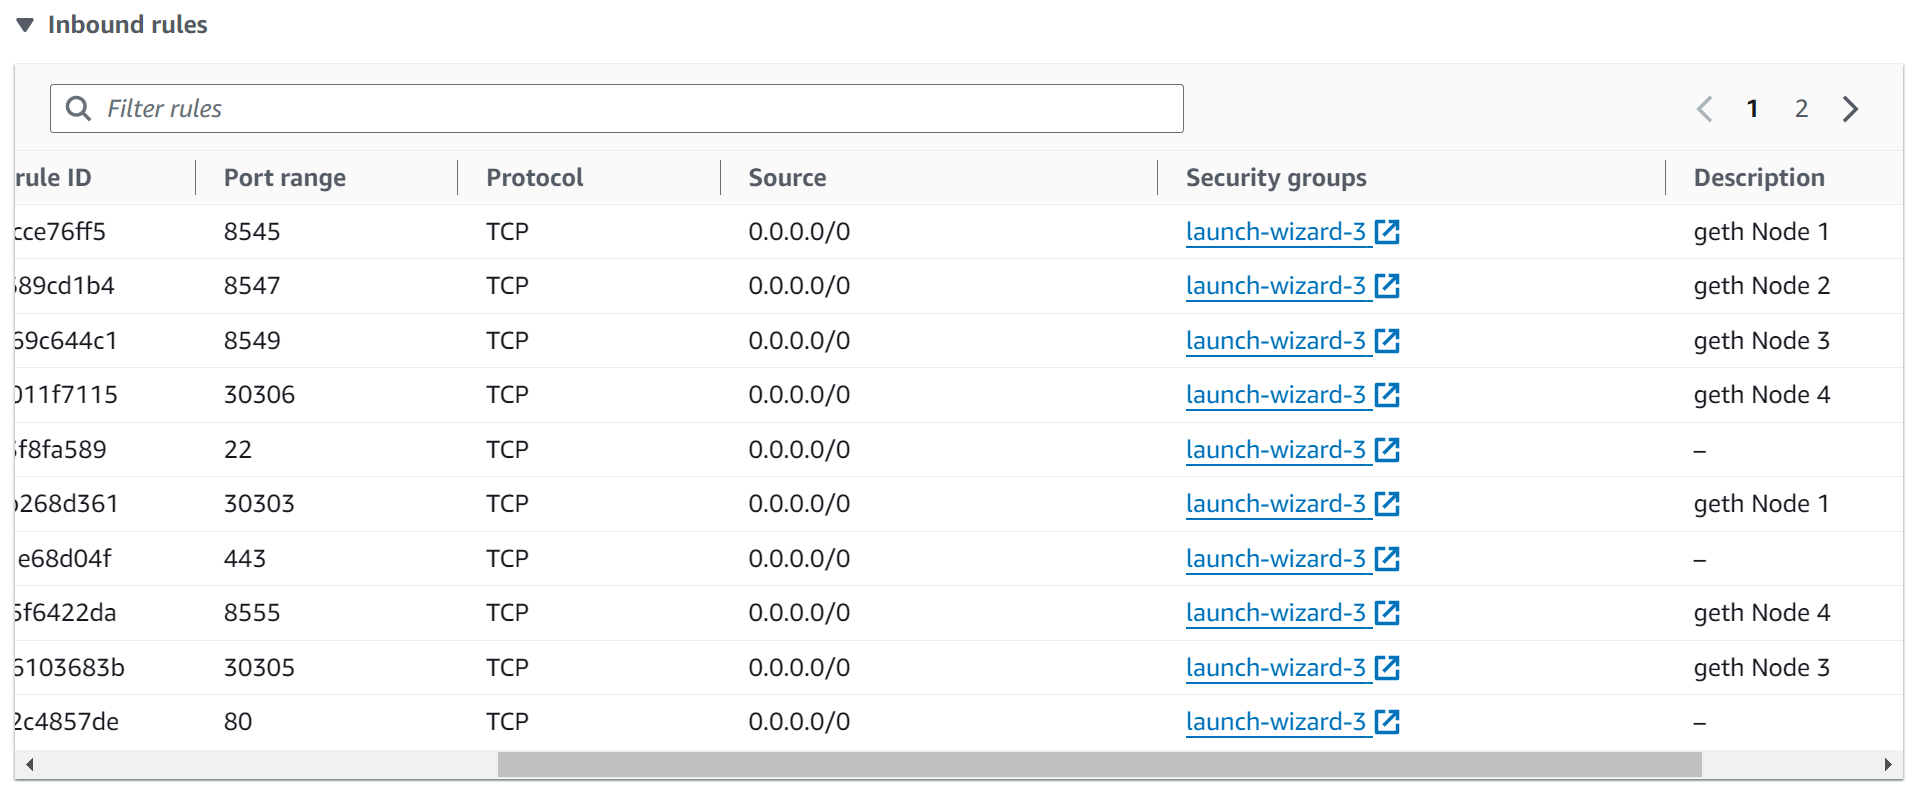
It is possible to install and run your nodes on a cloud server. This process has been successfully tested on AWS EC2 instances. There are a few differences in the commands, specifically related to the ports, and a specific configuration is required on the AWS EC2 firewall security policy (see below).
More detailed guidance will be provided to subscribers.
1. Ubuntu on Windows
If you are working on a Windows machine you can install the Windows Subsystem for Linux (WSL) which provides you a virtual Ubuntu instance. To install WSL run the following command from your Windows Powershell. You can get more details here: WSL Installation
wsl --installTo stay organized, create a working directory (we call it devnet) and run all your commands inside that directory or its sub-directories as specified. Some softwares are installed in the system directories while some are installed in your working directory.
2. Install Go Ethereum (geth)
geth is the execution client software for an ethereum node. To install the geth software run the following commands:
sudo add-apt-repository -y ppa:ethereum/ethereum
sudo apt-get update
sudo apt-get install ethereum
Test that the installation was successful by running:
geth --help3. Install Lighthouse
Lighthouse is one of the Consensus clients we will use in our network. Multiple steps are required to install Lighthouse.
3.1 Install Rust and Cargo
These are required to compile the Lighthouse source code (written in the Rust programming language) to binaries (which we can execute as a program).
Run the following command and select the standard installation.
curl --proto '=https' --tlsv1.2 -sSf https://sh.rustup.rs | shRestart the current shell before proceeding to allow the installation and path updates to take effect, without which the subsequent steps may fail or result in unpredictable behavior.
Test that the installations were successful by running each of the following:
cargo version
rustc -V
rustup -V
3.2 Install the required packages
sudo apt update
sudo apt install -y git gcc g++ make cmake pkg-config llvm-dev libclang-dev clang
3.3 Download and Make Lighthouse
Run the following commands (make sure you are in your working directory):
git clone https://github.com/sigp/lighthouse.git
cd lighthouse
git checkout stable
makeThe make process can take quite some time to complete (as long as 30 minutes on a computer with 16Gb RAM).
Test that the installation was successful by running:
lighthouse -help4. Install Prysm
Prysm is another Consensus clients we will use in our network. Multiple steps are required to install Prysm.
4.1 Install Go
Go is the compiler required to compile the Prysm source code (written in the Go programming language) to binaries (which we can execute as a program).
If you have a graphical user interface you can go to the page below and download the Linux version of the installer (a .tar file).
Go InstallationIf you are working from the command line you will need to follow the steps below:
Go to the page mentioned above and find the link to download the Linux installer. Instead of clicking on it, hover your mouse on the link, right click, and click on "Copy Link Address". Then run the following command to download the installer.
Note: This process has been tested with version 1.22.x, 1.23 or later may not work.
wget [the link address just copied]Run the following command to extract and install Go from the tar file. You may need to run this as a superuser (sudo).
sudo tar -C /usr/local -xzf go1.22.5.linux-amd64.tar.gzUpdate the PATH environment variable for Go by adding the following line in your .bashrc file (you may have a different file in your environment):
PATH=$PATH:/usr/local/go/binFor the environment variable to be updated you can restart the shell or run the following command:
source ~/.bashrcTest that the installation was successful by running:
go version4.2 Download and Build Prysm
Run the following commands (make sure you are in your working directory):
git clone https://github.com/prysmaticlabs/prysm
cd prysm
go build -o=./beacon-chain ./cmd/beacon-chain
go build -o=./validator ./cmd/validator
go build -o=./prysmctl ./cmd/prysmctl
cd ..
Update the PATH environment variables for Prysm by adding the following line in your .bashrc file (you may have a different file in your environment):
Replace [path_to_prysm] with the path to your prysm directory. You can get the exact value by running pwd from inside your prysm directory.
PATH=$PATH:[path_to_prysm]
PATH=$PATH:[path_to_prysm]/beacon-chain
PATH=$PATH:[path_to_prysm]/validator
For the environment variable to be updated you can restart the shell or run the following command:
source ~/.bashrcTest that the installation was successful by running each of the following:
beacon-chain --help
validator --help
prysmctl --help
5. Install Validator Mnemonics Generator
Download and extract the file by running the two commands below (make sure you are in your working directory):
wget https://github.com/ethereum/staking-deposit-cli/releases/download/v2.7.0/staking_deposit-cli-fdab65d-linux-amd64.tar.gz
tar -xvzf staking_deposit-cli-fdab65d-linux-amd64.tar.gz
Update the PATH environment variable by adding the following line in your .bashrc file (you may have a different file in your environment):
You can get the exact value by running pwd from inside the installed directory which will be the same name as the .tar.gz file.
PATH=$PATH:[path_to_working_directory]/staking_deposit-cli-fdab65d-linux-amd64For the environment variable to be updated you can restart the shell or run the following command:
source ~/.bashrcTest that the installation was successful by running the following:
deposit --help6. Install the program to generate genesis.ssz file
This requires Go which we have already installed. Run the following commands (make sure you are in your working directory):
git clone https://github.com/protolambda/eth2-testnet-genesis
cd eth2-testnet-genesis
make build
Update the PATH environment variable by adding the following line in your .bashrc file (you may have a different file in your environment):
You can get the exact value by running pwd from inside the installed directory which will be the same name as the .tar.gz file.
PATH=$PATH:[path_to_working_directory]/eth2-testnet-genesisFor the environment variable to be updated you can restart the shell or run the following command:
source ~/.bashrcTest that the installation was successful by running the following:
eth2-testnet-genesis --help7. Install jq, a command line JSON processor
Run the following commands to install and test that the installation was successful:
sudo apt-get install jq
jq --help
8. Install yq, a command line YAML processor
Run the following commands to install and test that the installation was successful:
sudo snap install yq
yq --help
9. Install openssl
Confirm if openssl is already installed by running the command below:
openssl versionIf it is not already installed, then run the following commands to install and test that the installation was successful:
sudo apt install openssl
openssl --help
The directory structure at the end of the installation is shown below (assuming devnet is your working directory):
/devnet
/eth2-testnet-genesis
- go1.22.5.linux-amd64.tar.gz
/lighthouse
/prysm
/staking_deposit-cli-fdab65d-linux-amd64
-staking_deposit-cli-fdab65d-linux-amd64.tar.gz
All the software required to run your devnet has now been installed. You can go to the next section which will explain how to deploy the Devnet nodes.