Overview
This project demonstrates how to use a Pushbutton Switch to control the state of an external Buzzer connected to a microcontroller. When the pushbutton is pressed, the buzzer starts the sound and remains on as long as the pushbutton remains pressed; when released, it turns off.
Components
| Component | Purpose |
|---|---|
| Arduino Nano | The microcontroller. |
| 4-pin Tactile Pushbutton | The pushbutton switch. |
| Basic Buzzer | The buzzer controlled by the switch. |
Circuit Diagram
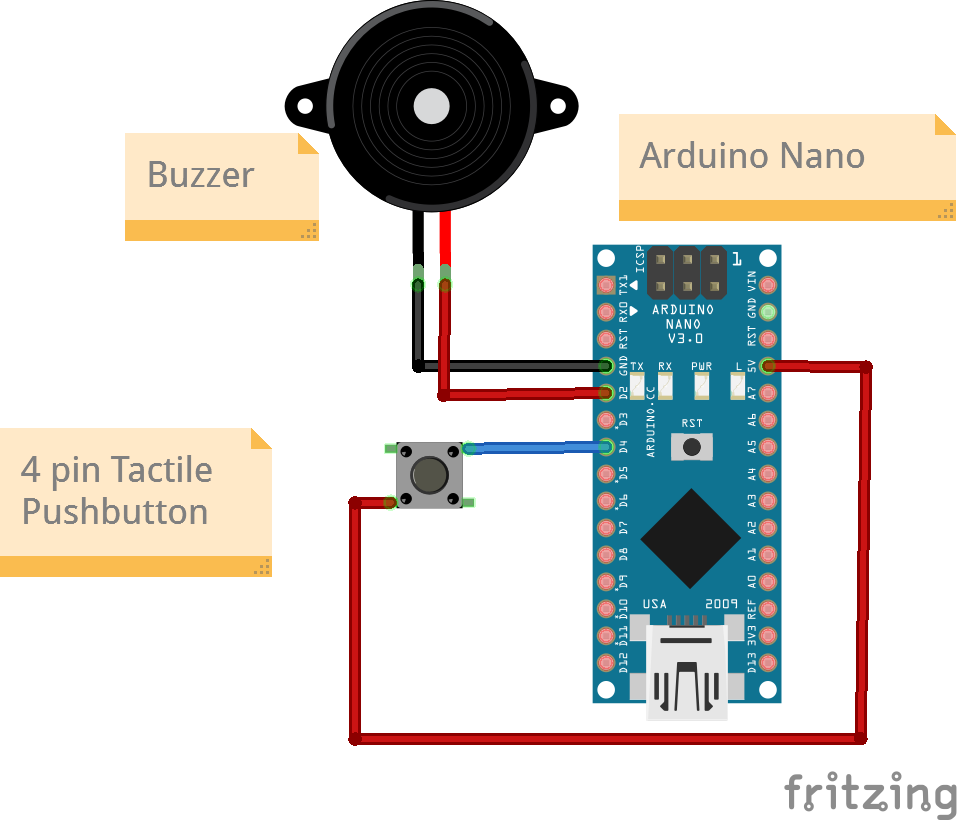
Connections
Note: For the pushbutton, Pin1 and Pin2 are any two pins out of the 4 on a pushbutton that are diagonal to each other.
4 pin Tactile Pushbutton
| Arduino Nano Pin | Pushbutton Pin |
|---|---|
| D12 | Pin1 |
| 5v | Pin2 |
Buzzer
| Arduino Nano Pin | Buzzer Pin |
|---|---|
| D2 | VCC |
| GND | Gnd |
Code
/*
  Project: Pushbutton controlling an external Buzzer.
  Project Description:
  This project will show you how to read a digital input from a pushbutton and send a digital signal to a pin to turn an external Buzzer on or off.

  Author: STEMVentor Educonsulting

  This code is copyrighted. Please do not reuse or share for any purpose other than for learning with subscribed STEMVentor programs.
  This code is for educational purposes only and is not for production use.
*/

// LIBRARIES

// PIN DEFINITIONS
// In a 4-pin push button the two pins on the same long side are connected together.
#define pushbuttonPin  4// The pushbutton pin
// In an Buzzer the longer pin is the anode (+ve) and is connected to the signal pin.
// The shorter pin is the cathode (-ve) and is connected to ground.
#define buzzerPin  2   // The Buzzer pin


// CONSTANT DEFINITIONS

// GLOBAL VARIABLES
bool buttonValue = false;  // For reading the pushbutton status.
// LOCAL FUNCTIONS

void buttonSetup()
{
  // initialize the pushbutton pin as an input.
  pinMode(pushbuttonPin, INPUT);
}
void buzzerSetup()
{
  // Initialize the Buzzer pin as an output.
  pinMode(buzzerPin, OUTPUT);
  digitalWrite(buzzerPin, LOW);
}

void readButtonValue()
{
  // Read the value of the pushbutton state.
  buttonValue = digitalRead(pushbuttonPin);
}

void digitalWriteBuzzer(bool value)
{
  // If the button is pressed the buttonValue is HIGH.
  if (value == true) {
    Serial.println("Buzzer on");
    // Turn Buzzer on.
    digitalWrite(buzzerPin, HIGH);
  } else {
    // Turn Buzzer off.
    Serial.println("Buzzer off");
    digitalWrite(buzzerPin, LOW);
  }
}
// THE setup FUNCTION RUNS ONCE WHEN YOU PRESS RESET OR POWER THE BOARD.
void setup() {
  Serial.begin(9600);
  buttonSetup();
  buzzerSetup();
  Serial.println("The board is ready!");
}

// THE loop FUNCTION RUNS OVER AND OVER AGAIN FOREVER UNTIL THE BOARD IS POWERED OFF.
void loop() {
  readButtonValue();
  digitalWriteBuzzer(buttonValue);
}