Overview
This project enables control of a 5V relay based on input received through the serial monitor. Users can input either '1' to switch the relay on or '0' to switch it off via the serial monitor.
Components
| Component | Purpose |
|---|---|
| Arduino Nano | This will be the microcontroller |
| 1 channel 5V relay | This will be the relay |
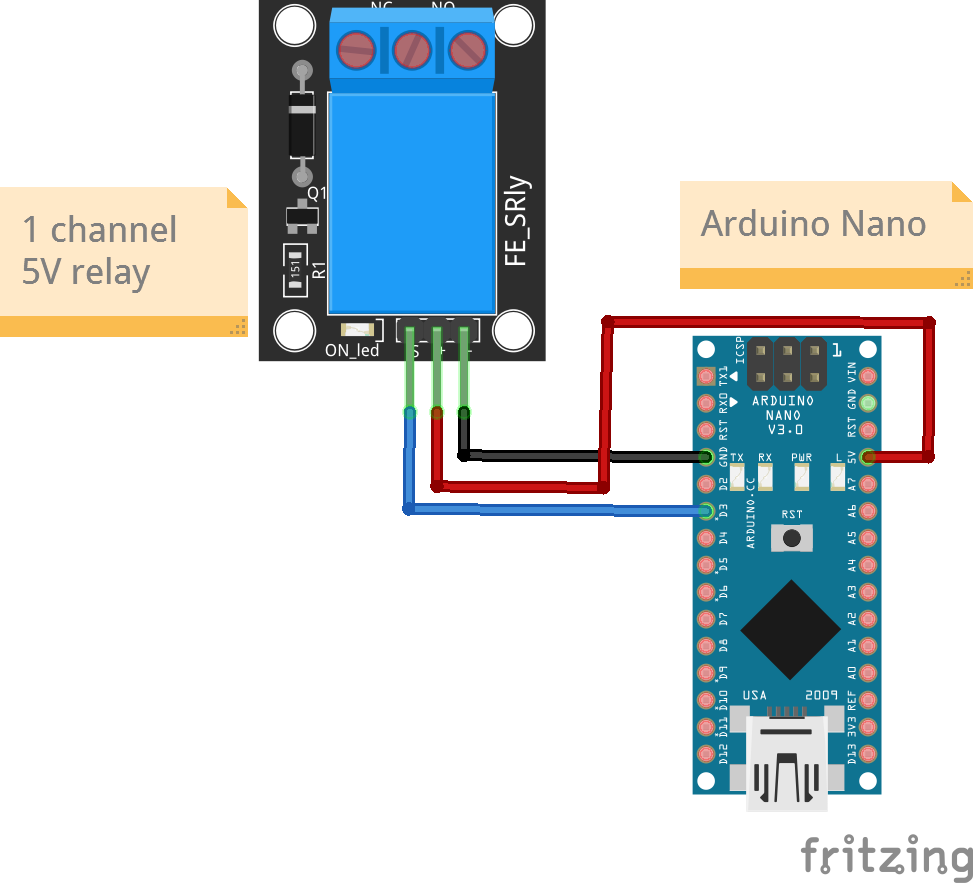
Circuit Diagram

Connections
1 channel 5V relay
| Nano Pin | Relay Pin |
|---|---|
| D4 | Sig |
| 5V | VCC |
| Gnd | Gnd |
Code
/*
  Project: Serial input with output as relay
  Project Description:
  This sketch writes readings reads from serial and accordingly switches a relay on or off.
  This sketch is for a 5v relay

  Author: STEMVentor Educonsulting

  This code is copyrighted. Please do not reuse or share for any purpose other than for learning with subscribed STEMVentor programs.
  This code is for educational purposes only and is not for production use.
*/

// LIBRARIES

// PIN DEFINITIONS
#define RelayPin 4
// CONSTANT DEFINITIONS

// GLOBAL VARIABLES
// Used for reading by character.
// Note that the 64 byte size of the Arduino serial input buffer does not limit the number of characters that you can receive
// because the code can empty the buffer faster than new data arrives.

// Used for reading an integer value.
int receivedString;

// LOCAL FUNCTIONS

// Read an entire string (this is a blocking function and waits until timeout).
void readString(){
  Serial.println("Enter 1 to switch on the relay");
  Serial.println("Enter 0 to switch off the relay");
  // Wait until data is available
  while (!Serial.available()) {}

  // Read characters until newline is encountered
  String input = Serial.readStringUntil('\n');

  // Convert the input string to an integer
  receivedString = input.toInt();

  // Print the entered value for confirmation
  Serial.print("Entered value: ");
  Serial.println(receivedString);

  // Clear the input buffer to prevent trailing characters
  while (Serial.available()) {
    Serial.read(); // Read and discard any remaining characters
  }
}

void digitalWriteRelay(int value)
{
  if ( value == 1){
    digitalWrite(RelayPin , HIGH);
    Serial.println("Relay is switched on");

  }

  else if ( value == 0){
    digitalWrite(RelayPin , LOW);
    Serial.println("Relay is switched off");
  }

  else {
    Serial.println("Invalid input");
  }
}

void relaySetup()
{
  // Define relay pin mode
  pinMode(RelayPin , OUTPUT);
  digitalWrite(RelayPin , LOW);
}
// THE setup FUNCTION RUNS ONCE WHEN YOU PRESS RESET OR POWER THE BOARD.
void setup() {
  Serial.begin(9600);
  relaySetup();
  Serial.println("The board is ready!");
}

// THE loop FUNCTION RUNS OVER AND OVER AGAIN FOREVER UNTIL THE BOARD IS POWERED OFF.
// Run only one option at a time (comment out all code for the other option).
void loop() {
  //  Read a string
  readString();
  digitalWriteRelay(receivedString);
}