Overview
In this project we will learn to use a Classic Bluetooth module along with a microcontroller to connect to and exchange data with a Bluetooth app. We will use one of several open source apps on andriod and ios are available to communicate via bluetooth.
In the ESP32 version of this project we will use the built-in bluetooth capability and an external module will not be required.
There are two versions of Bluetooth - Classic and Bluetooth Low Energy (BLE). The module we will use supports only classic bluetooth but BLE is the trend going forward. We will soon update this project to use a BLE module.
Components
| Component | Purpose |
|---|---|
| Arduino Nano | The microcontroller. |
| HC05 | The classic bluetooth module. |
Circuit Diagram
Connections
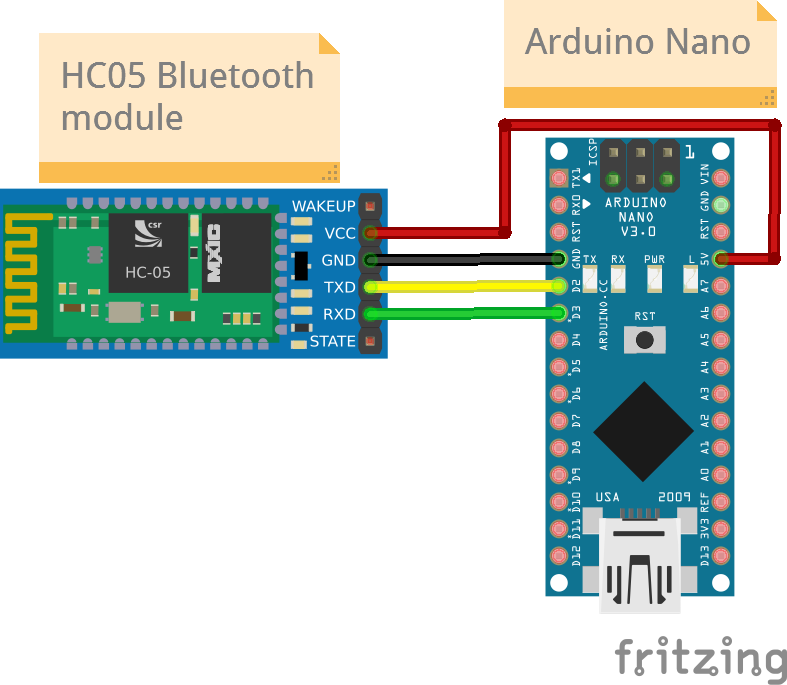
HC05 Pin Connections
| Nano Pin | HC05 Pin |
|---|---|
| D2 | TX |
| D3 | RX |
| 5V | VCC |
| GND | GND |
Code
/*
  Project: Serial In - Serial Out (using bluetooth)
  Project Description:
  This project shows you how to receive data on a board via bluetooth.

  Author: STEMVentor Educonsulting

  This code is copyrighted. Please do not reuse or share for any purpose other than for learning with subscribed STEMVentor programs.
  This code is for educational purposes only and is not for production use.
*/

// LIBRARIES
#include <SoftwareSerial.h> //to enable software communication with bluetooth module
// PIN DEFINTIONS
// Define the data transmit/receive pins in Arduino
#define TxD 3 //the RX of HC05 bluetooth module connects to pin D3 of Nano
#define RxD 2 //the TX of HC05 bluetooth module connects to pin D2 of Nano

// CONSTANT DEFINITIONS

// GLOBAL VARIABLES
// Used for reading by character.
// Note that the 64 byte size of the Arduino serial input buffer does not limit the number of characters that you can receive
// because the code can empty the buffer faster than new data arrives.

const byte numChars = 32; // Limit to 32 bytes (1 byte = 1 character, including the newline or string terminator)
char receivedChars[numChars]; // An array of characters, the size has to be pre-defined.
boolean numData = false;

// Used for reading a string.
String receivedString;

/* INITIALIZE OBJECTS
 * Libraries usually follow an object-oriented approach that requires
 * an instance of the class to call its methods.
 */

SoftwareSerial bluetoothSerial(RxD, TxD); // RX, TX for Bluetooth

// LOCAL FUNCTIONS
//setup function
void bluetoothSetup()
{
  bluetoothSerial.begin(9600); // For Bluetooth
}

//loop function
// Option 1: Read serial input by character and assemble into a string (array with line terminator).
void readBluetoothData()
{
  static byte index = 0;
  char eol_char = '\n'; // Set the serial monitor to send a New Line as the end character.
  char in_char;

  while (bluetoothSerial.available() > 0 && numData == false) {
    in_char = bluetoothSerial.read();

    if (in_char != eol_char) {
        receivedChars[index] = in_char;
        index++;
        if (index >= numChars) {
            index = numChars - 1;
        }
    }
    else {
        receivedChars[index] = '\0'; // terminate the string
        index = 0;
        numData = true;
    }
  }
}

// Option2: Read an entire string (this is a blocking function and waits until timeout).
void readBluetoothString()
{
  bluetoothSerial.println("Enter a data string to be sent via bluetooth:");
  while (bluetoothSerial.available() == 0) {}     //wait for data available
  receivedString = bluetoothSerial.readString();  //read until timeout
  receivedString.trim();                        // remove any \r \n whitespace at the end of the String
}

  // Option 1: Read by character
void option1()
{
  readBluetoothData();
  if (numData == true) {
      Serial.println(receivedChars);
      numData = false;
  }
}
 // Option2: Read an entire string (this is a blocking function and waits until timeout).
void option2()
{
  readBluetoothString();
  Serial.println(receivedString);
}

// THE setup FUNCTION RUNS ONCE WHEN YOU PRESS RESET OR POWER THE BOARD.
void setup()
{
  Serial.begin(9600);
  bluetoothSetup();
  Serial.println("The board is ready!");
}

// THE loop FUNCTION RUNS OVER AND OVER AGAIN FOREVER UNTIL THE BOARD IS POWERED OFF.
// Run only one option at a time (comment out all code for the other option).

void loop()
{
  //keep only one option uncommentted
  // option1();   //  Read by character
  option2();  //  Read by string
}