Liquid Crystal Display (LCD)
Arduino circuits need to display input data from sensors for a human to read. There are a few types of electronic displays available for use with Arduino boards, the most commonly used one being liquid crystal displays (LCDs).
An LCD is a flat-panel display that uses the light-modulating properties of liquid crystals. Liquid crystals do not emit light directly, instead of that use a backlight or reflector to produce images in color or monochrome. LCDs are available to display arbitrary images (as in a general-purpose computer display) or fixed images with low information content, such as preset words, digits, and seven-segment displays (as in a digital clock). They use the same basic technology, except that arbitrary images are made up of several tiny pixels, while other displays have a smaller number of pixels.
LCDs can either be on (positive) or off (negative). For example, a character-positive LCD with a backlight will have black lettering on a background that is the backlight color, and a character-negative LCD will have a black background with the letters being of the same color as the backlight.
LCDs are used in various applications, including LCD televisions, computer monitors, instrument panels, aircraft cockpit displays, and indoor and outdoor signage. Small LCD screens are common in portable consumer devices, such as digital cameras, watches, calculators, and mobile telephones, including smartphones. LCD screens are also used on consumer electronics products, such as DVD players, video game devices, and clocks.
LCDs come in various sizes, with multiple rows and columns. A single character is displayed on one cell (intersection of column and row), thus allowing up to 32 characters to be displayed on the screen at one time. Of course, the amount of data you can display on an LCD is far lesser than what you can output on your computer.
An LCD needs a lot of pin connections, which can be cumbersome to manage. To simplify the connections, LCDs come with what is known as an I2C backpack. I2C (Inter-Circuit Communication) is a simple bidirectional protocol that is used to send data and signals between two boards or between a board and a module and works with just two data pins.
Components
| Component | Purpose | Comm. Protocol | Current | Voltage |
|---|---|---|---|---|
| Arduino Nano | The microcontroller | - | 500mA | 5V |
| I2C LCD 20X4 | The LCD display | I2C | 120mA | 5V |
Circuit Diagram
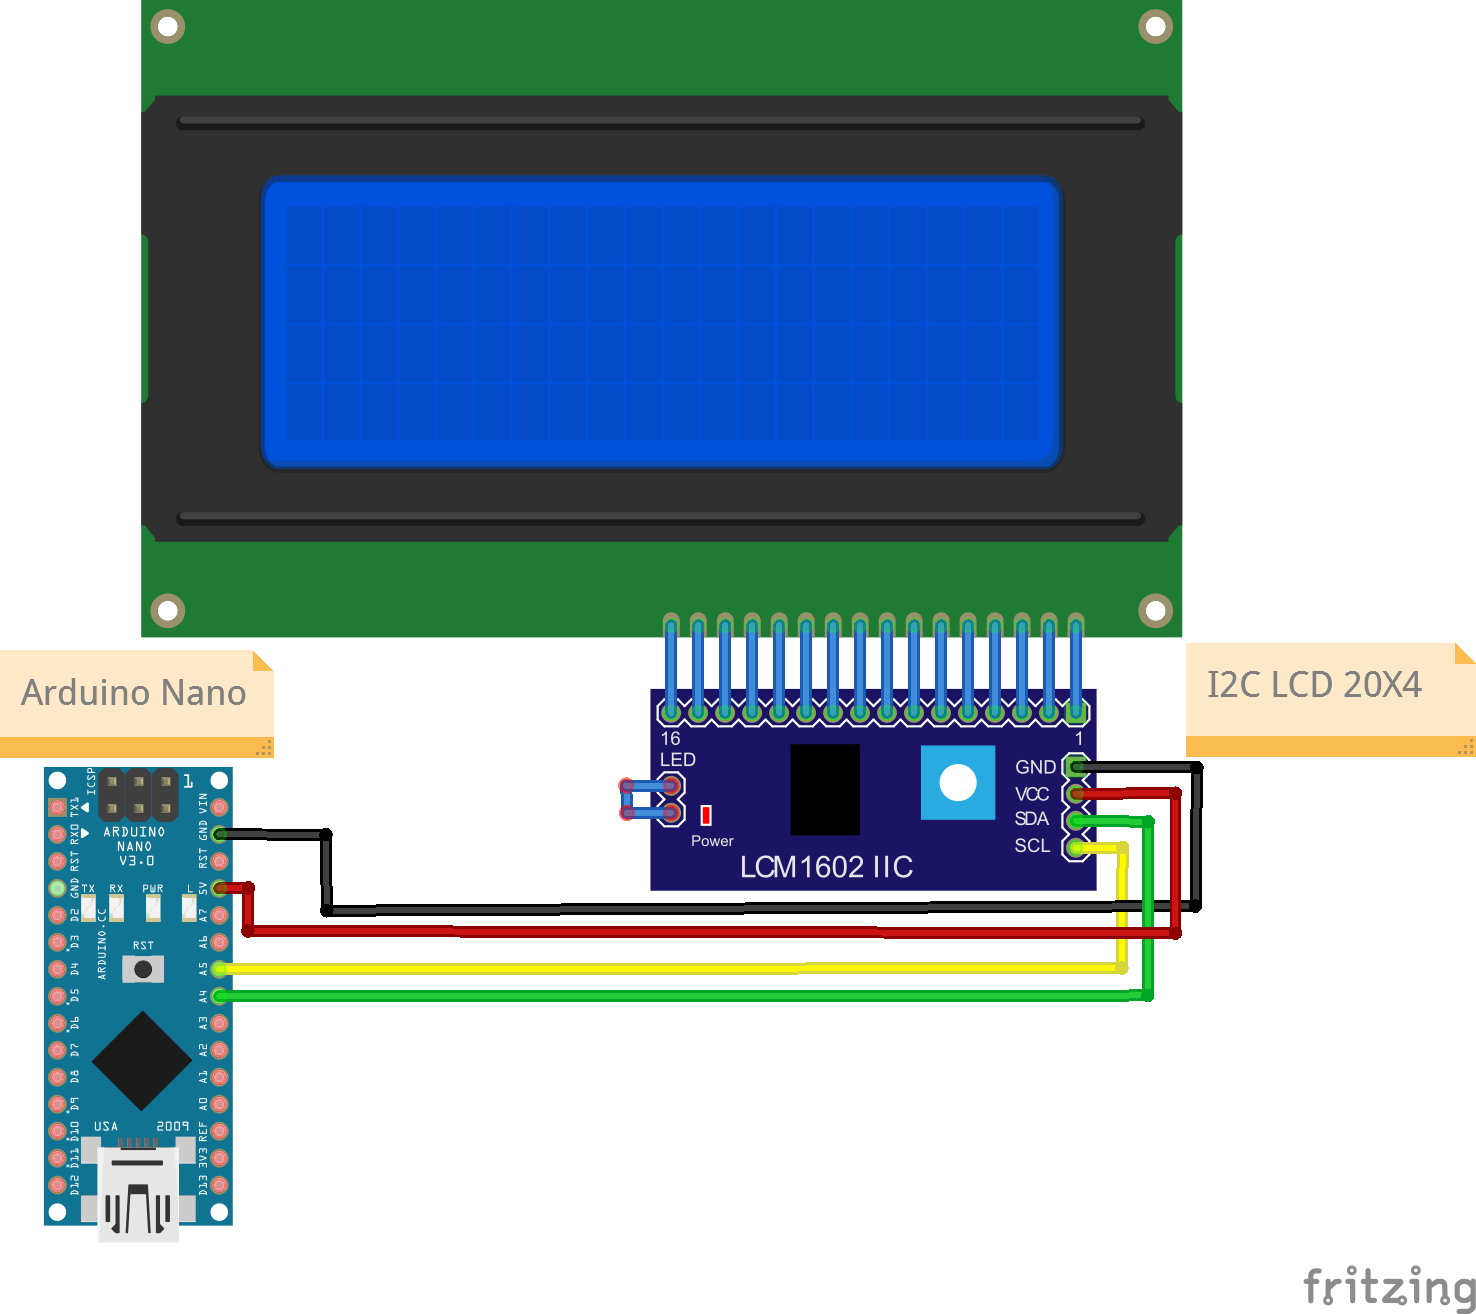
Connections
I2C LCD Pin
| Nano Pin | I2C LCD Pin |
|---|---|
| A4 | SDA |
| A5 | SCL |
| 5V | VCC |
| GND | GND |
While modules have the SDA and SCL pins specifically marked, you have to identify the SDA and SCL pins on the board.
Code
/*
  Project: Physical Computing
  Circuit: LCD
  Boards Supported: UNO R3/R4, Nano, ESP32
  Function: This project will display text on an LCD display.

  Author: STEMVentor Educonsulting

  This code is copyrighted. Please do not reuse or share for any purpose other than for learning with subscribed STEMVentor programs. This code is for educational purposes only and is not for production use.
*/

// LIBRARIES
// For communicating with I2C devices. Pre-installed with IDE.
#include <Wire.h>
//https://www.arduino.cc/reference/en/libraries/liquidcrystal-i2c/
// Install the library "LiquidCrystal I2C by Frank de Brabander" from the IDE library manager.
#include <LiquidCrystal_I2C.h>

// PIN DEFINITIONS

// GLOBAL CONSTANTS

// GLOBAL VARIABLES
// Set display size in cols x rows (16x2 or 20x4)
const uint8_t COLS = 20;
const uint8_t ROWS = 4;

const String digits_16 = "1234567890123456";
const String chars_16 = "Lorem ipsum dolo.";
const String digits_20 = "12345678901234567890";
const String chars_20 = "Lorem ipsum dolor si.";
const String digits_32 = "12345678901234567890123456789012";
const String chars_32 = "Lorem ipsum dolor sit amet, con.";
const String long_string = "This is an 80-char string that should print across rows and fill the display.";

// INITIALIZE OBJECTS
// The init statement accepts the address and the number of columns and rows.
// All I2C components have an address, the default is usually 0x27
// If that doesn't work, see this: https://playground.arduino.cc/Main/I2cScanner/
LiquidCrystal_I2C lcd(0x27, COLS, ROWS);

/* LOCAL FUNCTIONS */
// This function clears a row by printing spaces.
void clearRow(int row){
  const char* sixteen_spaces = "                ";
  const char* twenty_spaces = "                    ";

  lcd.setCursor(0, row-1);

  if(COLS == 16){
    lcd.print(sixteen_spaces); //clears the row for a 16x2 display
  }else if(COLS == 20){
    lcd.print(twenty_spaces); //clears the row for a 20x4 display
  }
  lcd.setCursor(0, row-1); //cursor has to be set again after printing spaces
}
// Function to print to LCD on a single row.
// Takes the row number and the text to display on that row (max 16 or 20 chars, rest will be truncated).
// The entire display is cleared if the clearAll flag is true, else only the row is cleared (the default).
void printToLCDByRow(uint8_t row, String text, bool clear_all = false)
{
  if(clear_all){
    lcd.clear(); //clears the entire display
  }else{
    clearRow(row);
  }
  lcd.print(text);
}

// Function to print a long string to LCD across rows.
// Messages can be a maximum of 16x2(32) 20x4(80) chars, rest will be truncated.
// The entire display is cleared before printing the text.
void printToLcdAcrossRows(String text)
{
  lcd.clear(); //clears the entire display

  byte charsRemaining = text.length();
  byte charFrom = 0;
  byte charTo = charsRemaining < Cols ? text.length() : charFrom + Cols;
  byte row = 1;

  while(charsRemaining > 0){
    String line = text.substring(charFrom, charTo);
    printToLcdByRow(row, line);

    charsRemaining = text.length() - charTo;
    charFrom = charTo;
    charTo = charsRemaining < Cols ? text.length() : charFrom + Cols;
    row++;
  }

  Serial.println("Data string has been displayed on the LCD");
}

// This function prints the text on a row and scrolls left if the length exceeds
// the number of columns.
void scrollTextLeft(int row, String text, bool clear_all = false) {
  if(clear_all){
    lcd.clear(); //clears the entire display
  }else{
    clearRow(row);
  }

  // Print as many characters as will fit on the display (number of cols)
  // and if there are more characters then start scrolling.
  Serial.println(text);
  // For substring(), start index is 0 and end index should be one more than num chars required
  // substring(0, 20) returns 20 chars, 0 to 19.
  // Note that end index is the position not length.
  printToLCDByRow(row, text.substring(0, COLS), false);
  delay(2000);

  if(text.length() > COLS){
    uint8_t extra_chars = text.length() - COLS;
    for (int i = 0; i < extra_chars; i++) {
      // Redisplay the string starting from the second character until the last character is displayed.
      printToLCDByRow(row, text.substring(i+1, i+1+COLS), false);
      delay(2000); // Adjust delay for scrolling speed
    }
  }

}

// THE setup FUNCTION RUNS ONCE WHEN YOU PRESS RESET OR POWER THE BOARD.
void setup() {
  // Initializing wire
  Wire.begin();
  // Initialize the LCD.
  lcd.init();
  // Turn on the blacklight.
  lcd.backlight();
  // Clear the entire display.
  lcd.clear();

  // Use the functions to display text of various lengths.
  printToLCDByRow(1, "I2C LCD Ready!", true);
  delay(1000);
  printToLCDByRow(2, digits_16, false);
  delay(1000);
  printToLCDByRow(3, chars_16, false);
  delay(1000);
  printToLCDByRow(4, digits_20, false);
  delay(5000);
  scrollTextLeft(1, digits_32, true);
  delay(1000);
  scrollTextLeft(2, chars_32, false);
  delay(5000);
  printToLcdAcrossRows(long_string);
  delay(5000);
  printToLCDByRow(1, "I2C LCD Ready!", true);
}

void loop() {
  // All test strings will be display during setup, nothing to do in loop.
}