Liquid Crystal Display (LCD)
Arduino circuits can take inputs from sensors or a human interaction device such as a switch or a keypad. They then process the data and either send it to a processor for analysis or to a database to store. In many case, the data also needs to be displayed for a human to read. There are a few types of electronic displays available for use with Arduino boards, the most commonly used one being liquid crystal displays (LCDs).
An LCD is a flat-panel display that uses the light-modulating properties of liquid crystals. Liquid crystals do not emit light directly, instead of that use a backlight or reflector to produce images in color or monochrome. LCDs are available to display arbitrary images (as in a general-purpose computer display) or fixed images with low information content, such as preset words, digits, and seven-segment displays (as in a digital clock). They use the same basic technology, except that arbitrary images are made up of several tiny pixels, while other displays have a smaller number of pixels.
LCDs can either be on (positive) or off (negative). For example, a character-positive LCD with a backlight will have black lettering on a background that is the backlight color, and a character-negative LCD will have a black background with the letters being of the same color as the backlight.
LCDs are used in various applications, including LCD televisions, computer monitors, instrument panels, aircraft cockpit displays, and indoor and outdoor signage. Small LCD screens are common in portable consumer devices, such as digital cameras, watches, calculators, and mobile telephones, including smartphones. LCD screens are also used on consumer electronics products, such as DVD players, video game devices, and clocks.
LCDs come in various sizes, with multiple rows and columns. A single character is displayed on one cell (intersection of column and row), thus allowing up to 32 characters to be displayed on the screen at one time. Of course, the amount of data you can display on an LCD is far lesser than what you can output on your computer.
This project reads values entered from a Keypad and displays the entered values on a LCD Screen with an I2C Backpack.
I2C (Inter-Circuit Communication) is a simple bidirectional protocol that is used to send data and signals between two boards or between a board and a module. In this case the LCD comes with an I2C connector (also referred to as an I2C Backpack) that simiplifies connections.
Devices that work with I2C have an address that uniquely identifies them so a board can communicate with multiple I2C devices using their address.
Components
| Component | Purpose | Comm. Protocol | Current | Voltage |
|---|---|---|---|---|
| Arduino Nano | The microcontroller | - | 500mA | 5V |
| I2C LCD 20X4 | The LCD display | I2C | 120mA | 5V |
| 4x4 keypad | Keypad for input | - | - | - |
Circuit Diagram
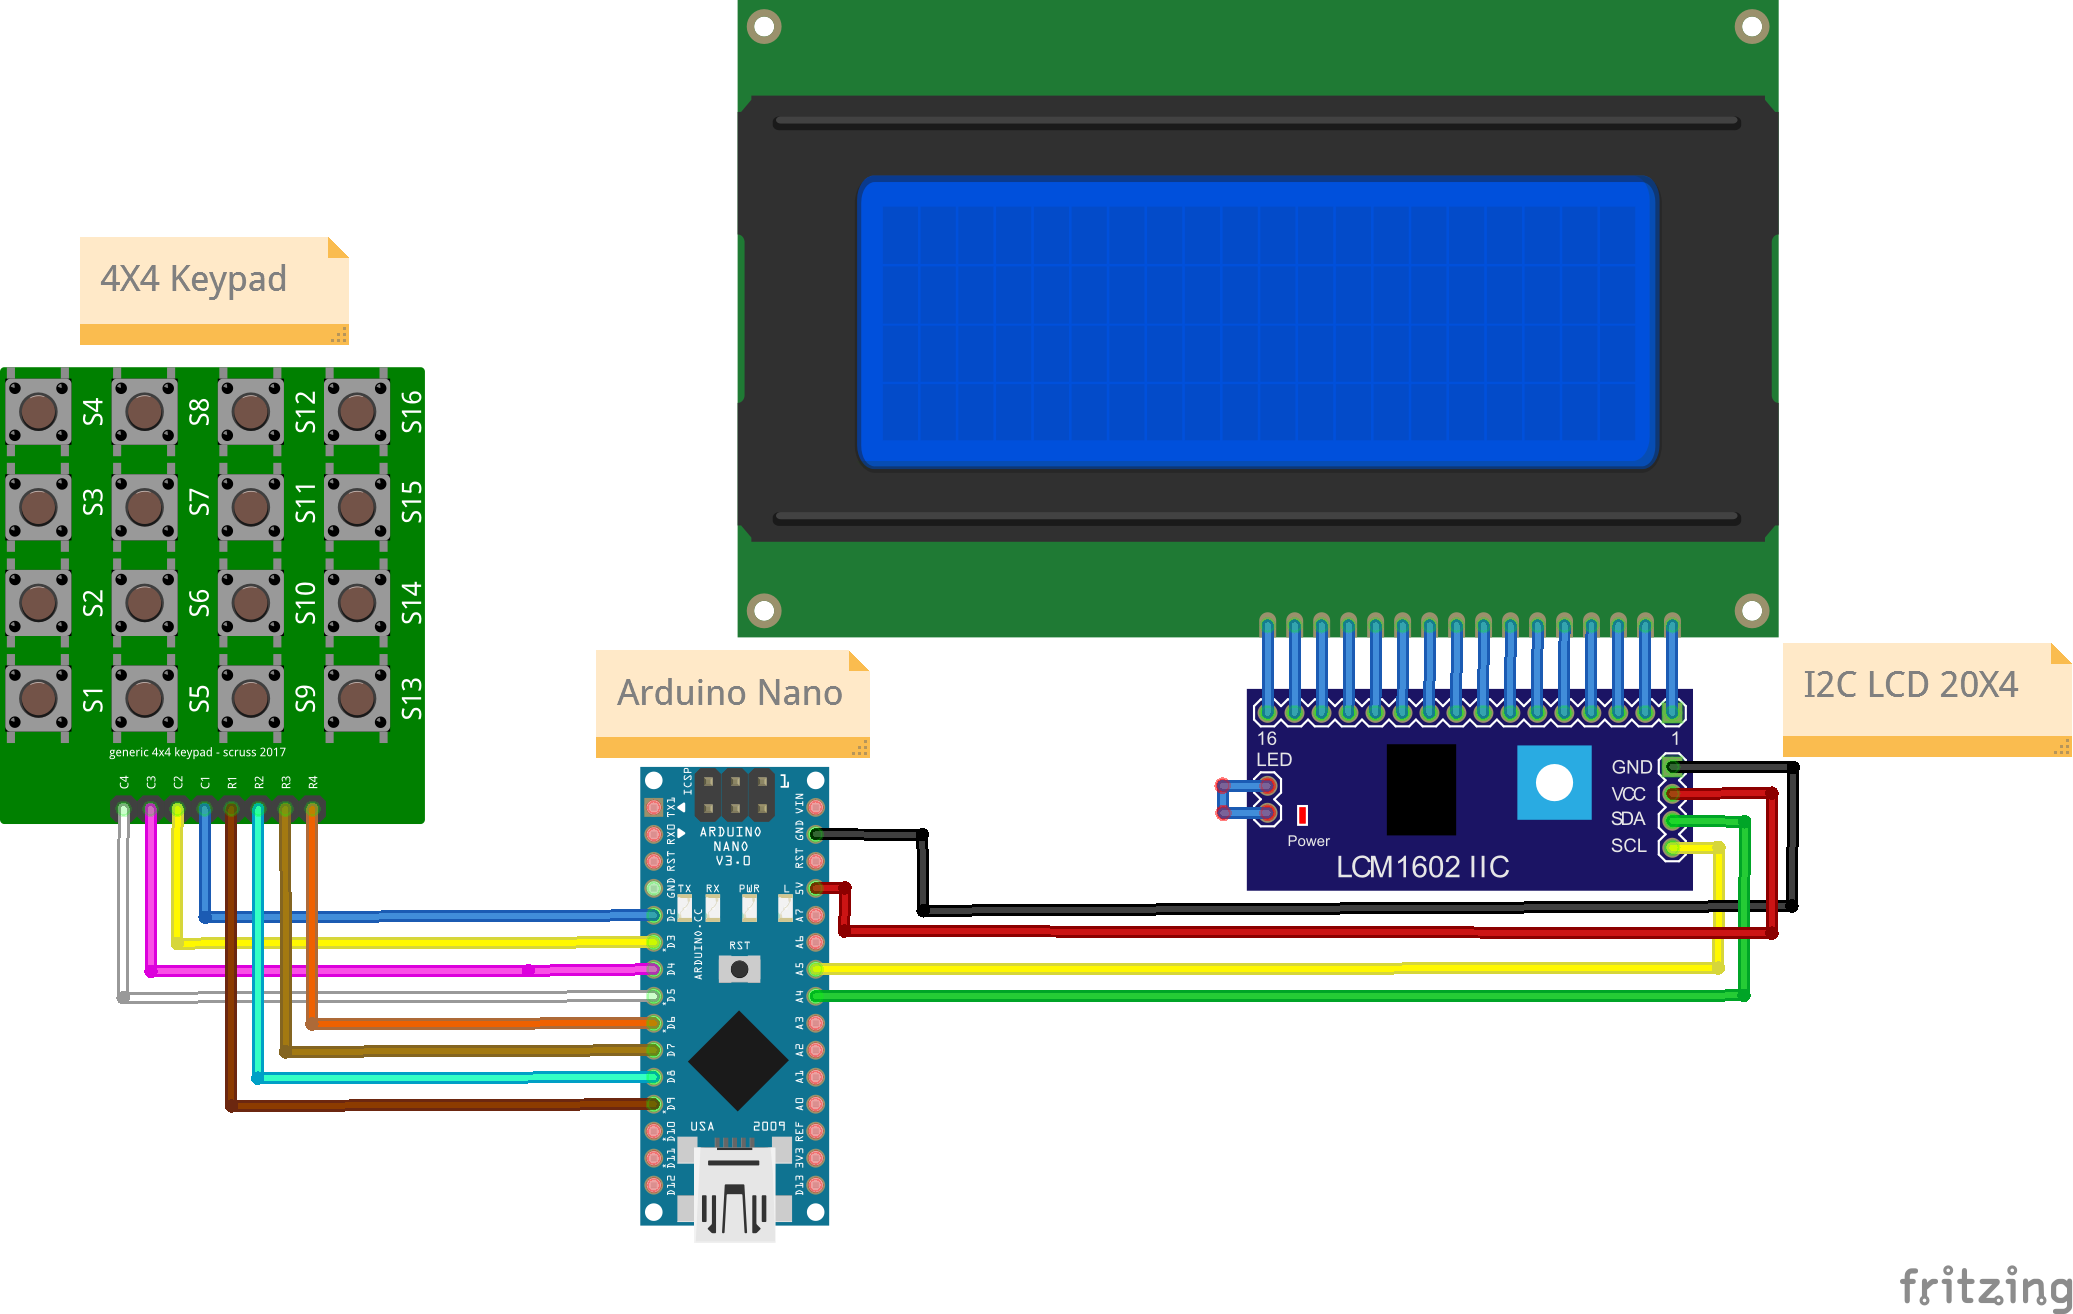
Connections
4x4 keypad pins
| Nano Pin | keypad Pin |
|---|---|
| D9 | R1 |
| D8 | R2 |
| D7 | R3 |
| D6 | R4 |
| D2 | C1 |
| D3 | C2 |
| D4 | C3 |
| D5 | C4 |
I2C LCD Pin
| Nano Pin | I2C LCD Pin |
|---|---|
| A4 | SDA |
| A5 | SCL |
| 5V | VCC |
| GND | GND |
General I2C Connections
While modules have the SDA and SCL pins specifically marked, you have to identify the SDA and SCL pins on the board.
| Main | Peripheral |
|---|---|
| SDA | SDA |
| SCL | SCL |
Code
/*
  Project: keypad input with output as LCD with I2C Backpack
  Project Description:
  This sketch writes data from the keypad input to an LCD display module.
  This sketch is for a 20x4 screen.

  Author: STEMVentor Educonsulting

  This code is copyrighted. Please do not reuse or share for any purpose other than for learning with subscribed STEMVentor programs.
  This code is for educational purposes only and is not for production use.
*/

// LIBRARIES

#include <Wire.h> //used for communicating with I2C devices
#include <Keypad.h> //used for keypad

//https://www.arduino.cc/reference/en/libraries/liquidcrystal-i2c/
// Install the LiquidCrystal I2C by Frank de Brabander from the IDE library manager.
#include <LiquidCrystal_I2C.h>


// PIN DEFINITIONS

// GLOBAL VARIABLES
// Define the display size
const byte lcdRows = 4;
const byte lcdColumns = 20;
const uint8_t keypadRows = 4;
const uint8_t keypadColumns = 4;

char keys[keypadRows][keypadColumns] = {            //matrix for keypad button values
  { '1', '2', '3', 'A' },
  { '4', '5', '6', 'B' },
  { '7', '8', '9', 'C' },
  { '*', '0', '#', 'D' }
};

//for arduino nano
uint8_t colPins[keypadColumns] = { 2, 3, 4, 5 }; // Pins connected to C1, C2, C3, C4 (column pins)
uint8_t rowPins[keypadRows] = { 9, 8, 7, 6 }; // Pins connected to R1, R2, R3, R4 (row pins)

//for ESP32
//uncomment if using ESP32
// byte colPins[COLUMN_NUM] = {32, 33, 35, 26};   // Pins connected to C1, C2, C3, C4 (column pins)
// byte rowPins[ROW_NUM]      = {13, 12, 14, 27}; // Pins connected to R1, R2, R3, R4 (row pins)


// Used for reading entered key.
String receivedKey;

/* INITIALIZE OBJECTS
 * Libraries usually follow an object-oriented approach that requires
 * an instance of the class to call its methods.
 */
 Keypad keypad = Keypad(makeKeymap(keys), rowPins, colPins, keypadRows, keypadColumns);
/*
 * All I2C components have an address, the default is usually 0x27
 * If that doesn't work, see this:https://playground.arduino.cc/Main/I2cScanner/
 * The init statement accepts the address and the number of columns and lcd_lcdRows.
 */
LiquidCrystal_I2C lcd(0x27, lcdColumns, lcdRows);

/* LOCAL FUNCTIONS */

// read sensor values
void readkeypad(){
  Serial.println("Enter a data string:");
  char key = keypad.getKey(); //to read the key/character entered

  while(key == NO_KEY) {
    key = keypad.getKey(); //keep on reading till a new character is entered
  }
  receivedKey = key;
}

/*
  Function to print to LCD on a single row.
  Takes the row number and the text to display on that row (max 20 chars, rest will be truncated).
  The entire display is cleared if the clear_all flag is true, else only the row is cleared (the default).
 */
void printToLCDByRow(int row, String text, bool clear_all = false){
  const char* twenty_spaces = "                    ";

  if(clear_all){
    lcd.clear(); //clears the entire display
  }

  lcd.setCursor(0, row-1);
  lcd.print(twenty_spaces); //clears the row
  lcd.setCursor(0, row-1); //cursor has to be set again after printing spaces
  lcd.print(text);
}

/*
 Function to print to LCD across lcdRows with each row having 20 chars.
 Messages can be a maximum of 20x4 chars, rest will betruncated.
 The entire display is cleared before printing the text.
 Test string of 20 char:
 12345678901234567890
 Test strings of 80 chars:
 12345678901234567890123456789012345678901234567890123456789012345678901234567890
 Lorem ipsum dolor sit amet, consectetur adipiscing elit. Donec varius est donec.

 */
void printToLCD(String text){
  lcd.clear(); //clears the entire display

  byte chars_remaining = text.length();
  byte char_from = 0;
  byte char_to = chars_remaining < lcdColumns ? text.length() : char_from + lcdColumns;
  byte row = 1;

  while(chars_remaining > 0){
    String line = text.substring(char_from, char_to);
    printToLCDByRow(row, line);

    chars_remaining = text.length() - char_to;
    char_from = char_to;
    char_to = chars_remaining < lcdColumns ? text.length() : char_from + lcdColumns;
    row++;
  }

  Serial.println("Key has been displayed on LCD");
}

void LCD_setup()
{
  // Initializing wire
  Wire.begin();
  // Initialize the LCD.
  lcd.init();
  // Turn on the blacklight and print a message.
  lcd.backlight();
  // Use the function to display text on each line indiviudally.
  printToLCDByRow(1, "I2C LCD Ready!", true);
  printToLCDByRow(2, "Enter some text.", false);
  printToLCDByRow(3, "Max 80 characters.", false);
  printToLCDByRow(4, "For a 20x4 LCD.", false);
}
/* SETUP CODE: runs once when the board starts up or resets */
void setup()
{
  // Start the serial communication with baud rate suitable for your components.
  Serial.begin(9600);
  LCD_setup();
  Serial.println("The board is ready!");
  printToLCDByRow(1, "Entered key is", true);
}

/* MAIN LOOP: runs repeatedly at a very high frequency (1000s of times a second) */
void loop() {
  readkeypad();
  printToLCDByRow(2, receivedKey, false);
}
Address Finder Code
If you are not sure of the I2C address of the device you are using, the code below can help you determine the address.
#include <Wire.h>

void setup() {
  Serial.begin (9600);
  delay(1000);
  // Leonardo: wait for serial port to connect
  while (!Serial)
    {
    }

  Serial.println ();

}  // end of setup

void loop() {
  delay(3000);
  Serial.println ("I2C scanner. Scanning ...");
  byte count = 0;

  Wire.begin();
  for (byte i = 8; i < 120; i++)
  {
    Wire.beginTransmission (i);
    if (Wire.endTransmission () == 0)
      {
      Serial.print ("Found address: ");
      Serial.print (i, DEC);
      Serial.print (" (0x");
      Serial.print (i, HEX);
      Serial.println (")");
      count++;
      delay (1);  // maybe unneeded?
      } // end of good response
  } // end of for loop
  Serial.println ("Done.");
  Serial.print ("Found ");
  Serial.print (count, DEC);
  Serial.println (" device(s).");
}